Rhino Rubiks Cube Exercise pt. 2
This second part of the Rubiks cube example will focus on repetition, using layers, boolean operations and detailing operations. Most of the tools we will be using can be found under the Solid Tools or Standard tabs above the command line.
Files
Instructions
1. Download the above file as an example and make sure Osnaps, layers panel and selection filters are active. Also ensure, your units are set to millimeters.

2. This model will primarily be visual therefore we will be cutting some extra corners (quite literally) to reduce the complexity.
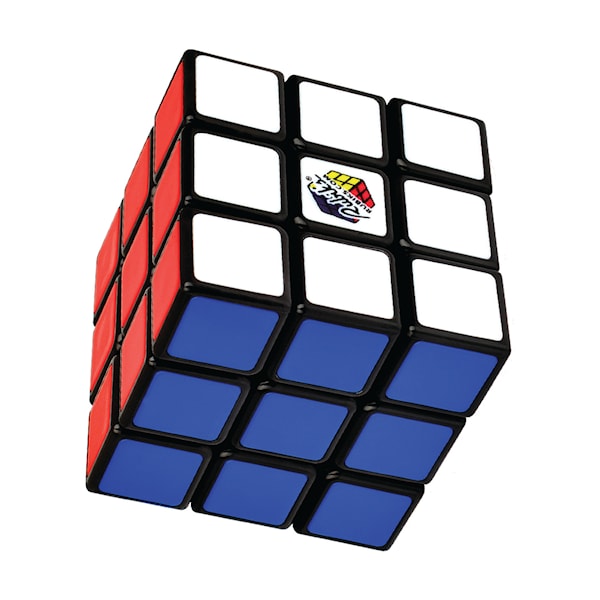
Look at the cube below. You’ll notice that we have 3 different types of cube in our 3x3x3 array.
– 3 sides of stickers
– 2 sides of stickers
– 1 side with a sticker
Also note that the sticker is indented into each cube and that the corners are filleted.
We know that this cube is 57mm cubed. Therefore, each “cubelet” will be 57/3mm
3. Now that we have analyzed the details lets get started by making the 3 sided cube. Create a 57/3mm Box (tool)
Make sure your Grid Snap is turned on or type 0 when you are prompted so you can place the base point at the origin.
Type 57/3 into the command bar when it asks you for the Other corner.
For the Height type 57/3 again.

4. Change the Perspective Viewport to shaded so we can see that this is a solid.

5. On the Perspective View, use the DupFaceBorder (tool) to copy the border of one of the faces.
**Note: To duplicate any edges or surface borders the command will always start with “Dup…”

6. Create an Offset (tool) of the border you just created at a Distance of 2mm.


7. Use the Fillet (tool) the lines so the base is at the origin.
Type fillet into the command line
Set the Distance to 1.5mm
Select one edge near the corner you want to fillet.
Then select the other edge near the corner.
Repeat until all corners are rounded.

8. Use ExtrudeCrv (tool) to extrude a Solid by 1mm into the cube.

9. Create a new layer called “tools” and copy the solid you just created.

Right click on the “tools” layer and choose Copy to layer

You should now have two of these rounded edged bodies.
10. Now we will need to make the sticker. It should have a slight split line difference between the “cublet”
Hide the “tools” layer to ensure you do not select the wrong solid.

Use Scale2D (tool) and prepare to select your base point.
Make sure your Mid Osnap and SmartTrack are turned on.

Hover over the the midpoint of the front edge until the dot turns white.
Go to the adjacent (perpendicular) line and hover over that midpoint until it turns white as well.

You should now be able to hover in the middle with two lines locking you to the center.
Select this center point as your base point

Select one of the other midpoints as the second reference
Scale the solid so it is slightly smaller. This difference will be the split line.

11. Create a new layer called “stickers” and copy both the body you just scaled and the border we created earlier to the layer
Select both items by holding SHIFT and clicking.
Right click on the “stickers layer” and choose Change layer

JUST CHECKING: Let’s show and hide some layers so we know we have everything where it should be.


12. Show only the “tools” layer again. Select everything on this layer by clicking and dragging a selection box over everything. Group (tool) them using CTRL + G or typing group into the command line.

13. Copy this group using CTRL + C and paste CTRL + V and move into position.
Use the Gumball or the Rotate (tool) to rotate the pasted group 90 degrees.


Then use the Move (tool) command to align with one of the other 2 outside faces where there will be stickers.

14. Repeat the copy, paste and move with the remaining face. Select everything using Click + drag. Type ungroup to ungroup everything.

15. Now we are ready to start making each of the 3 cube types. Use BooleanDifference (tool) on of the front face to make a cutout.
**Note: All operations where we are adding, combining, intersecting or removing solid bodies uses Boolean logic. Just thing Solid Body = Boolean Operation
First, turn on the “default” layer
Type BooleanDifference in the command line
Select the body to subtract from (the cube). Hit ENTER or SPACE
Select the body to subtract with (the sticker tool). Hit ENTER or SPACE


16. Turn on the “stickers” layer and create a copy of the cube & sticker. Then move this copy to the center position of the cube. This is your one-sticker “cubelet”

17. Repeat the BoolDiff command on the bottom sticker spot.

18. Create a copy of the sticker and the border. Rotate and move this copy to the bottom of the cube like you did in step 12.


Copy this new, 2-sticker “cubelet” and the two stickers. Paste it in the position below the center, 1-sticker “cubelet”.

19. Repeat the BoolDiff command once more for the remaining side. Duplicate and move the sticker as well. No need to move or copy this 3-sticker “cubelet”. It is already in the correct position.

20. Using the FilletEdge (tool) round the appropriate edges with a radius of 1mm
**Note: If you accidentally select an edge you can hold CTRL and click the edge and it will be deselected

21. Copy, paste, rotate and move the cubes into position until you have a complete 3x3x3 cube.
