Lightweight PDFs from Illustrator and InDesign
Illustrator and InDesign documents can become slow to work with. Presentation PDFs skip pages or stop scrolling smoothly. Portfolio PDFs are too large for online sharing and emailing.
You can eliminate these problems respecting only a few things related to document set-up, image type and use, and PDF output settings.
See the examples below; a document containing 10 HD-resolution PNG images, each around 9 MB in size. Because the images are linked, the Illustrator file is only 3,8 MB in size, and the resulting PDF 2,3 MB; the InDesign file is only 1,9 MB in size, and the resulting PDF 2,2 MB. Both PDFs are still looking very good on screen, or when projected.
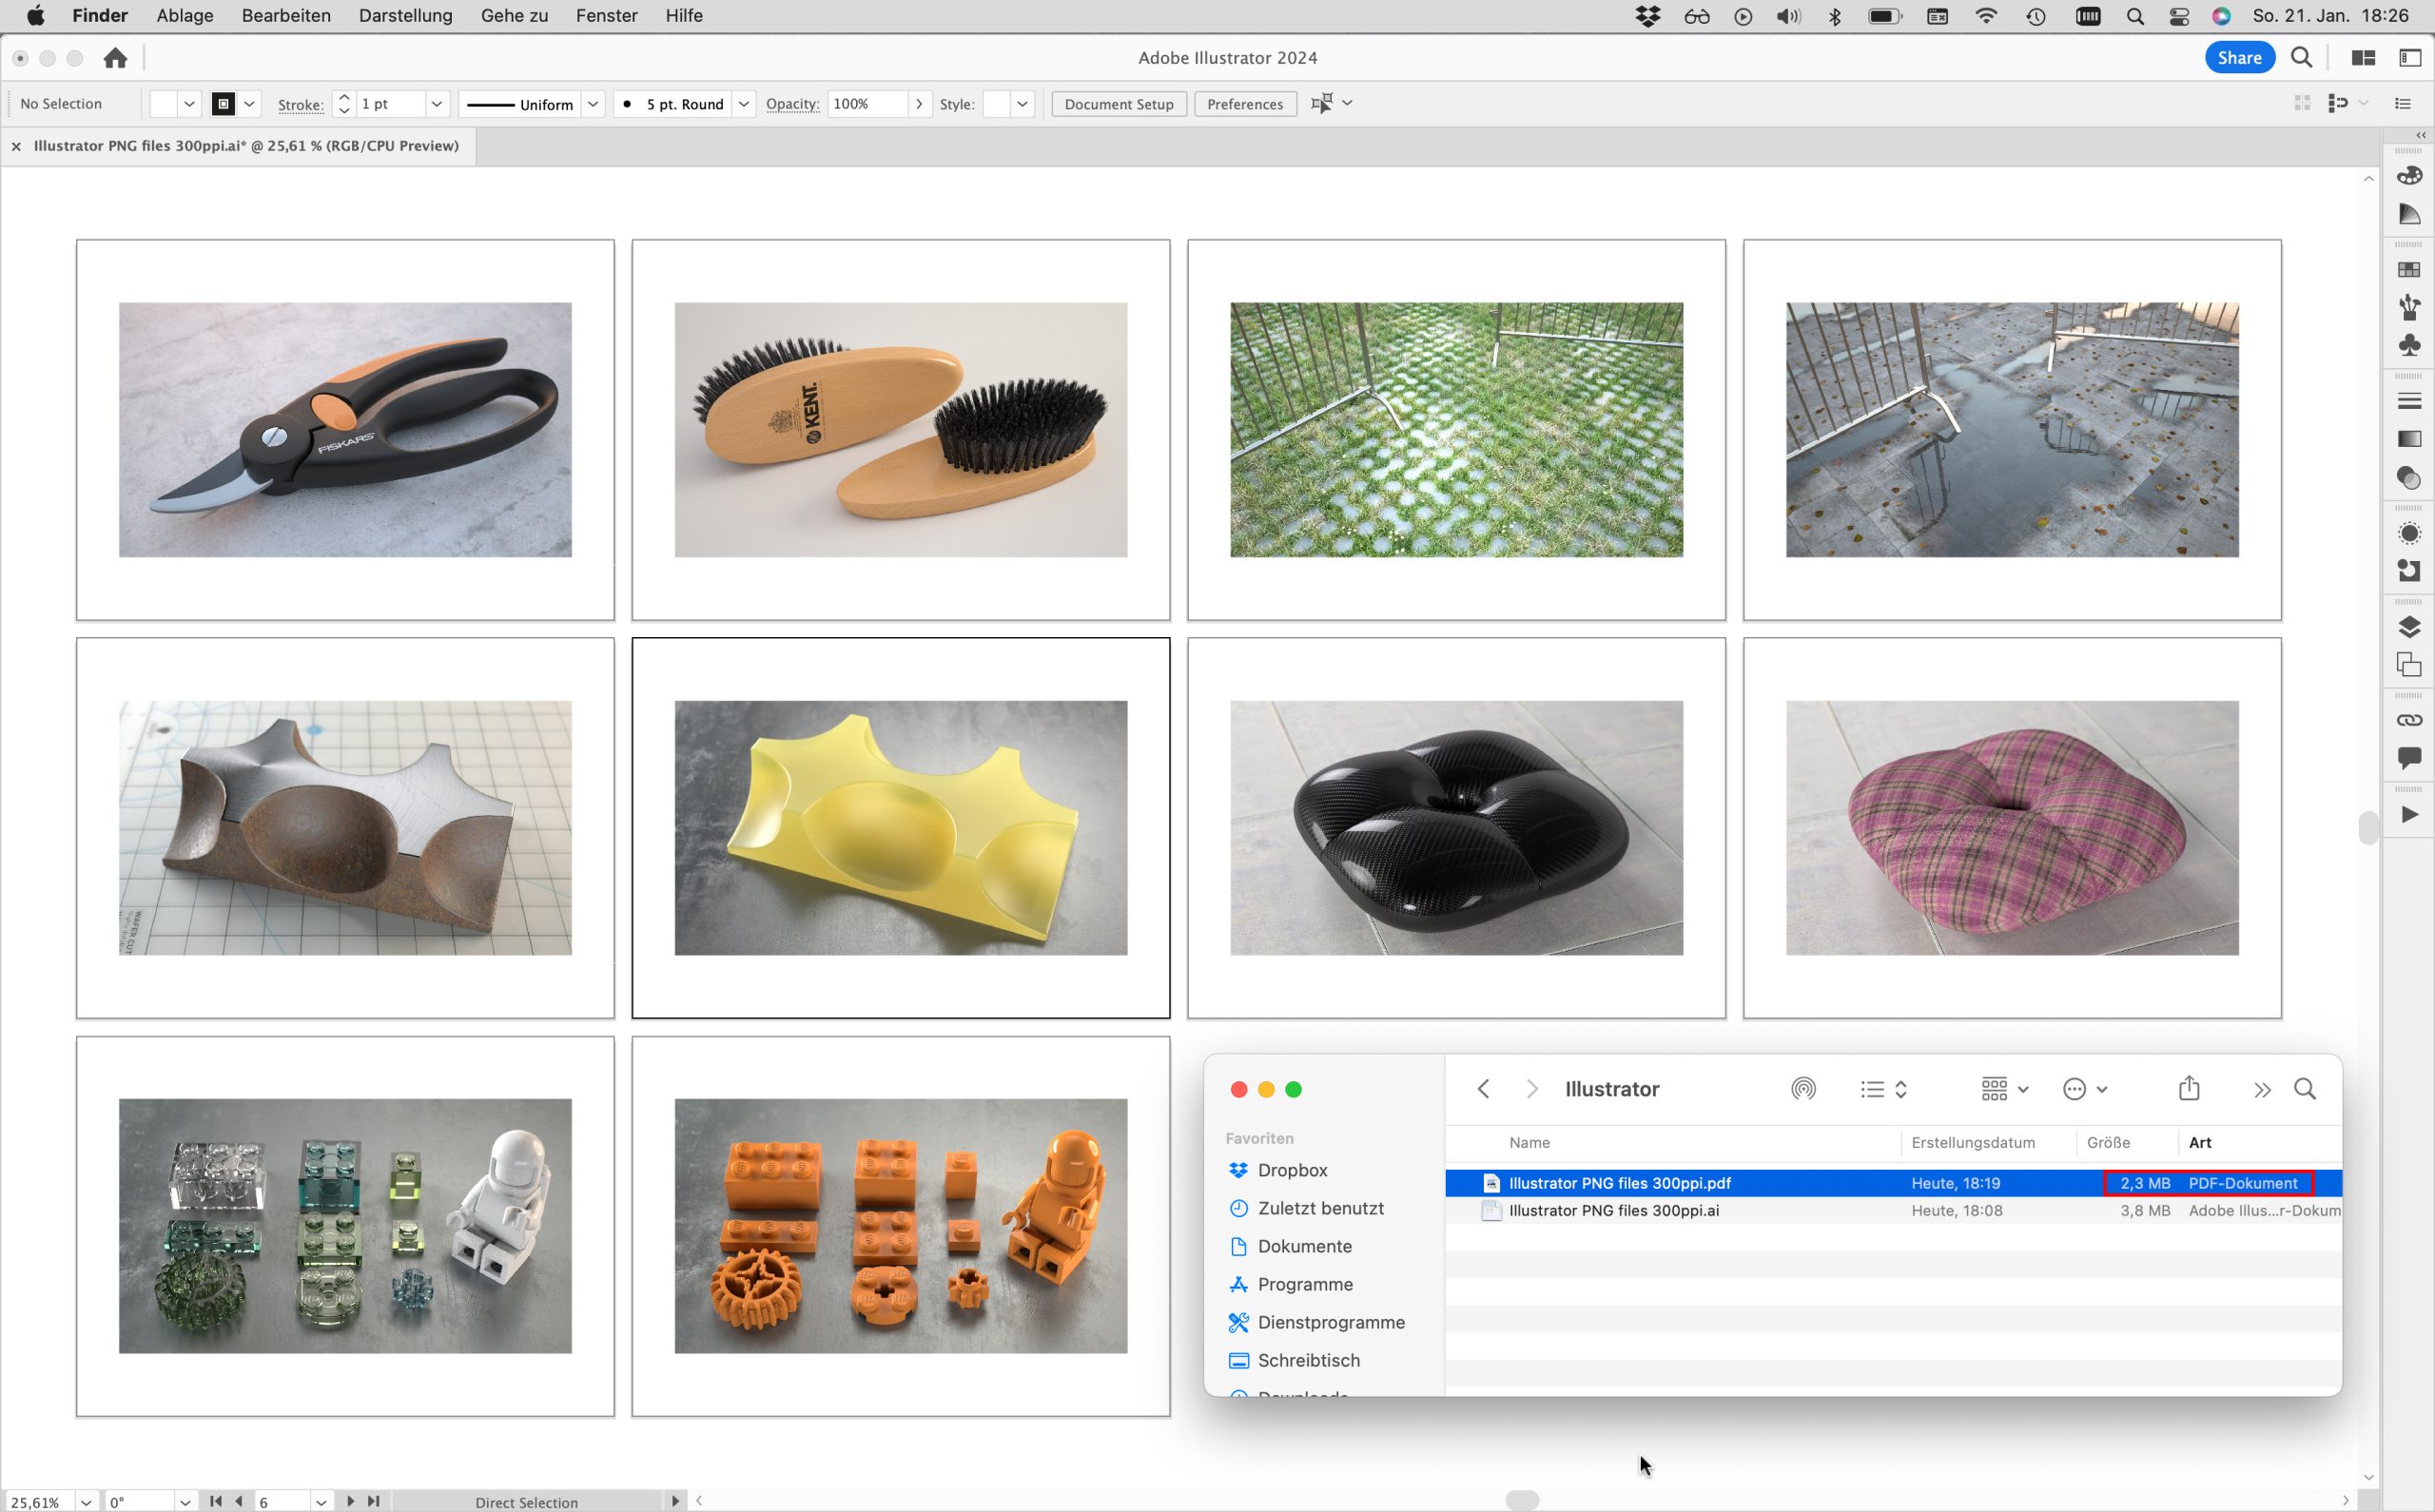
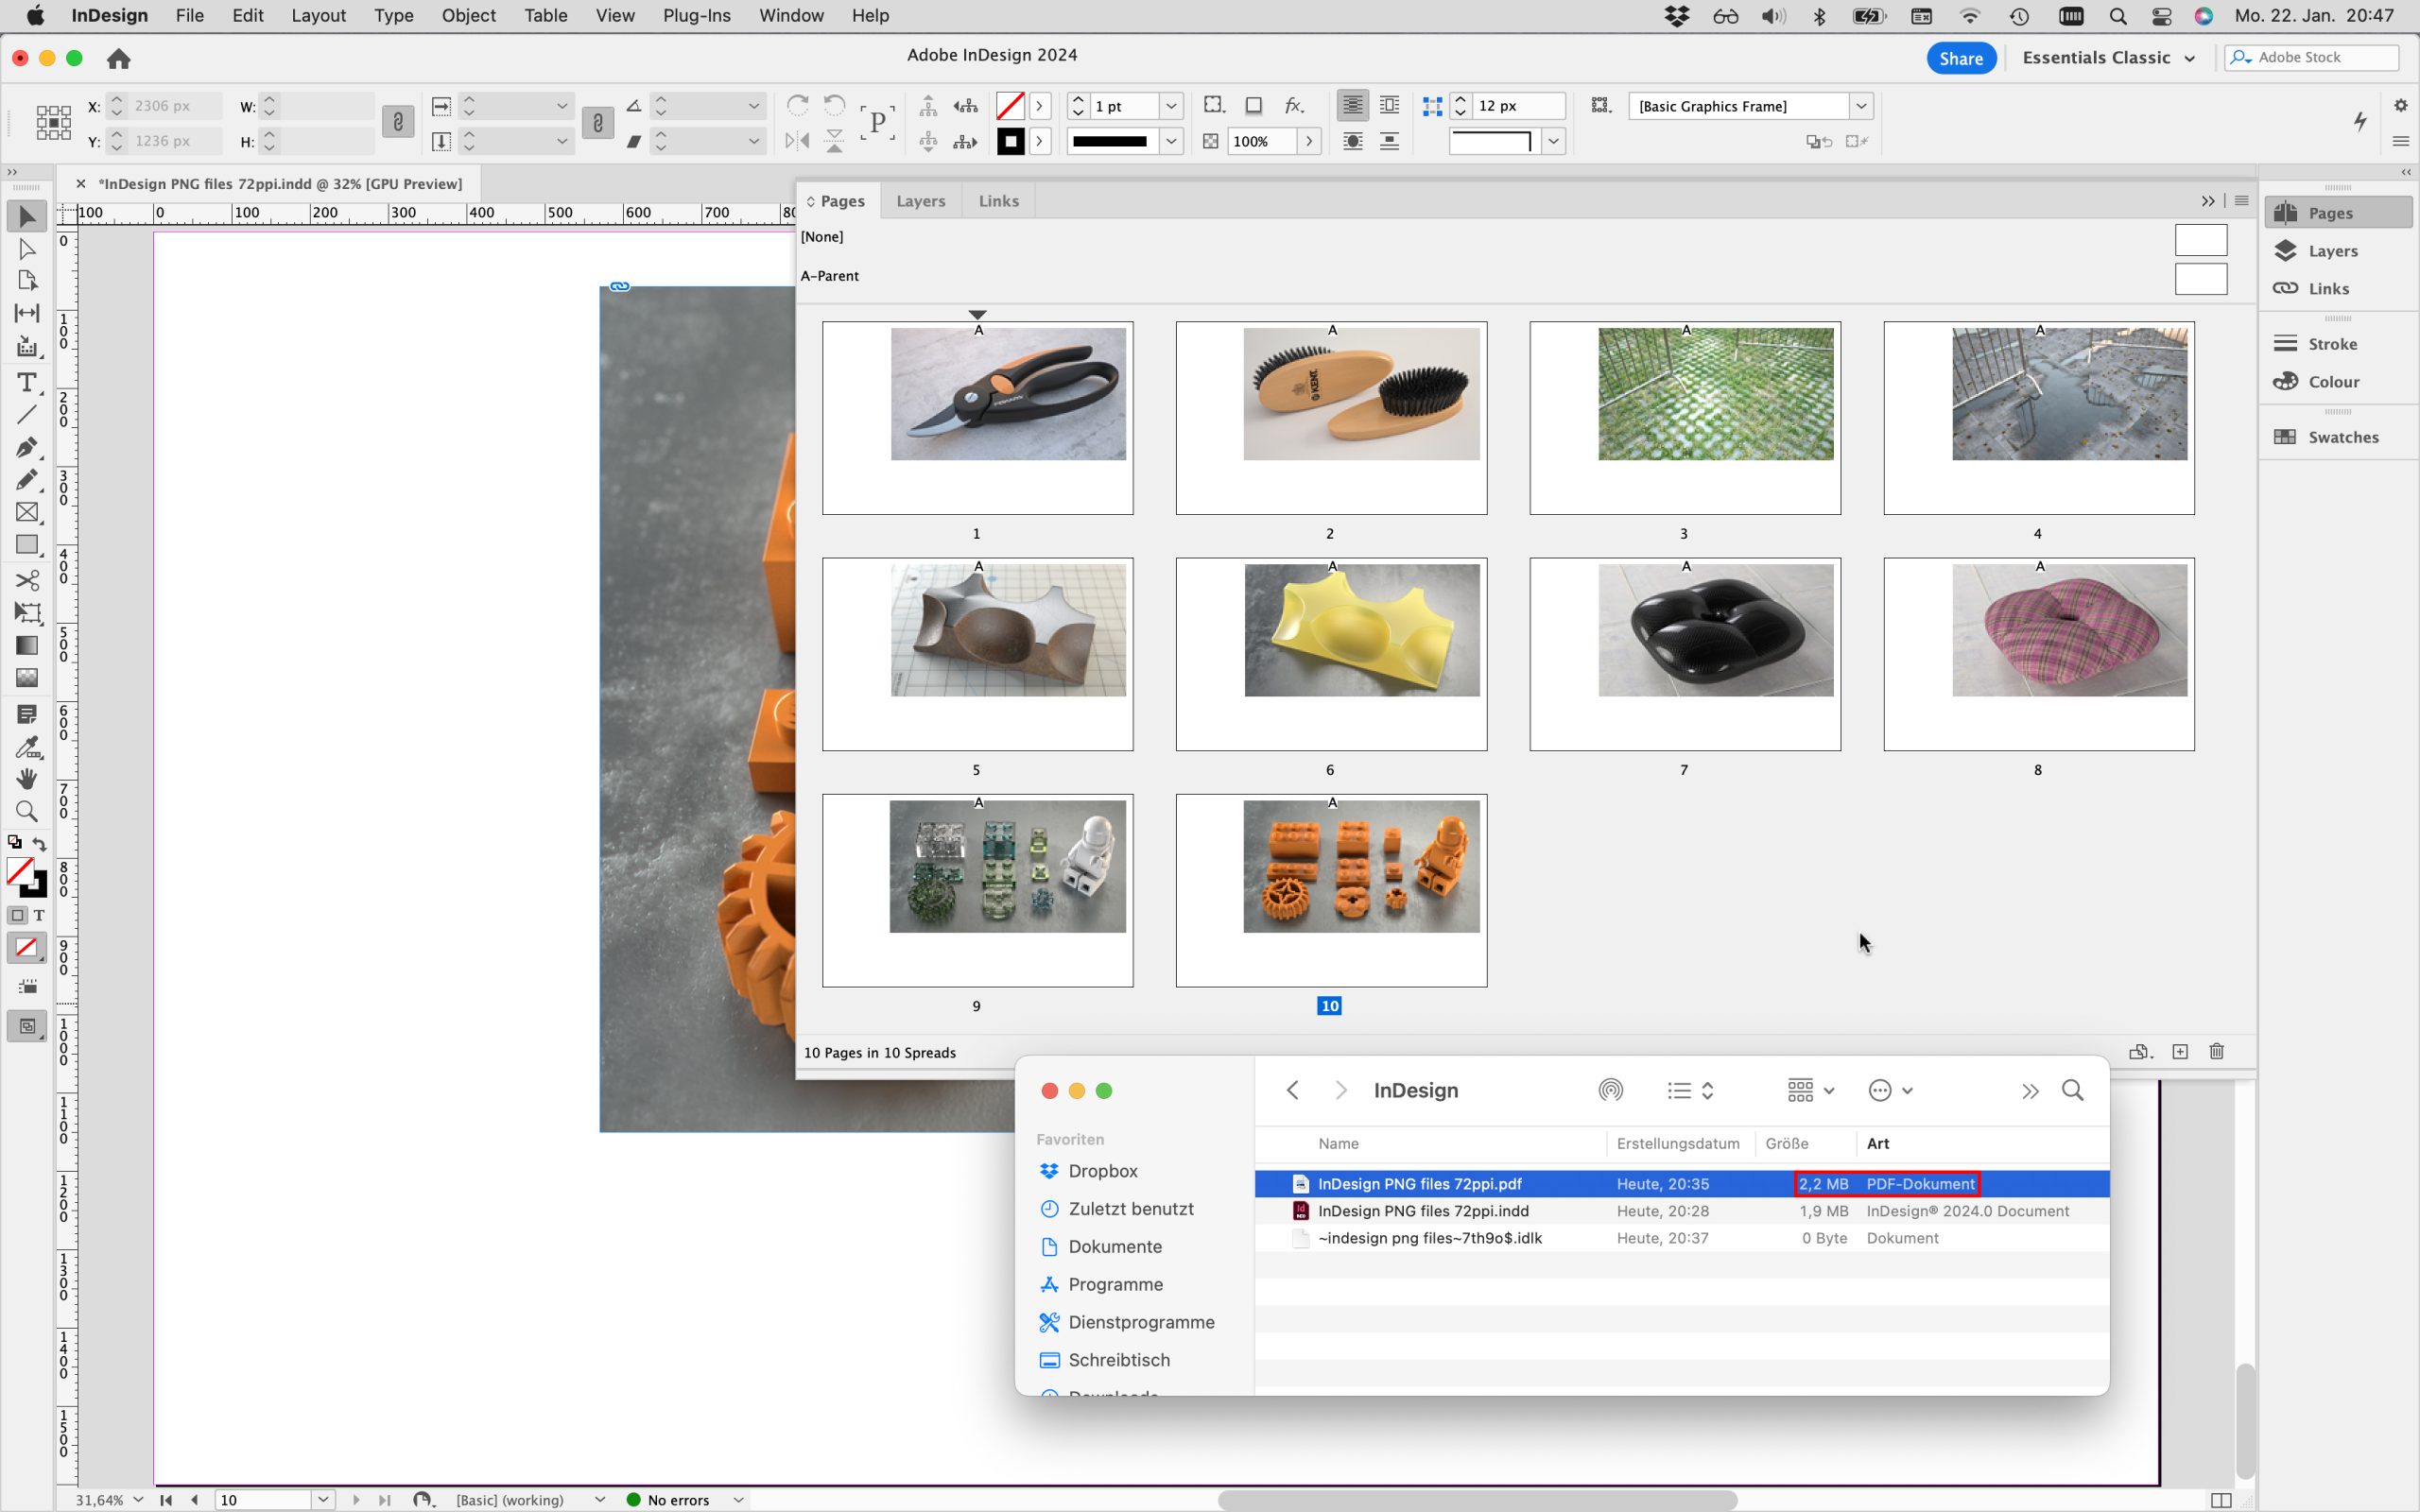
Table of contents
- Creating a document
- Saving a document
- Image types
- Inserting images
- Pixels, resolution, and scale
- Creating a preset for saving lightweight PDFs
- Saving Illustrator artboards as PDF
- Saving InDesign pages as PDF
Creating a document
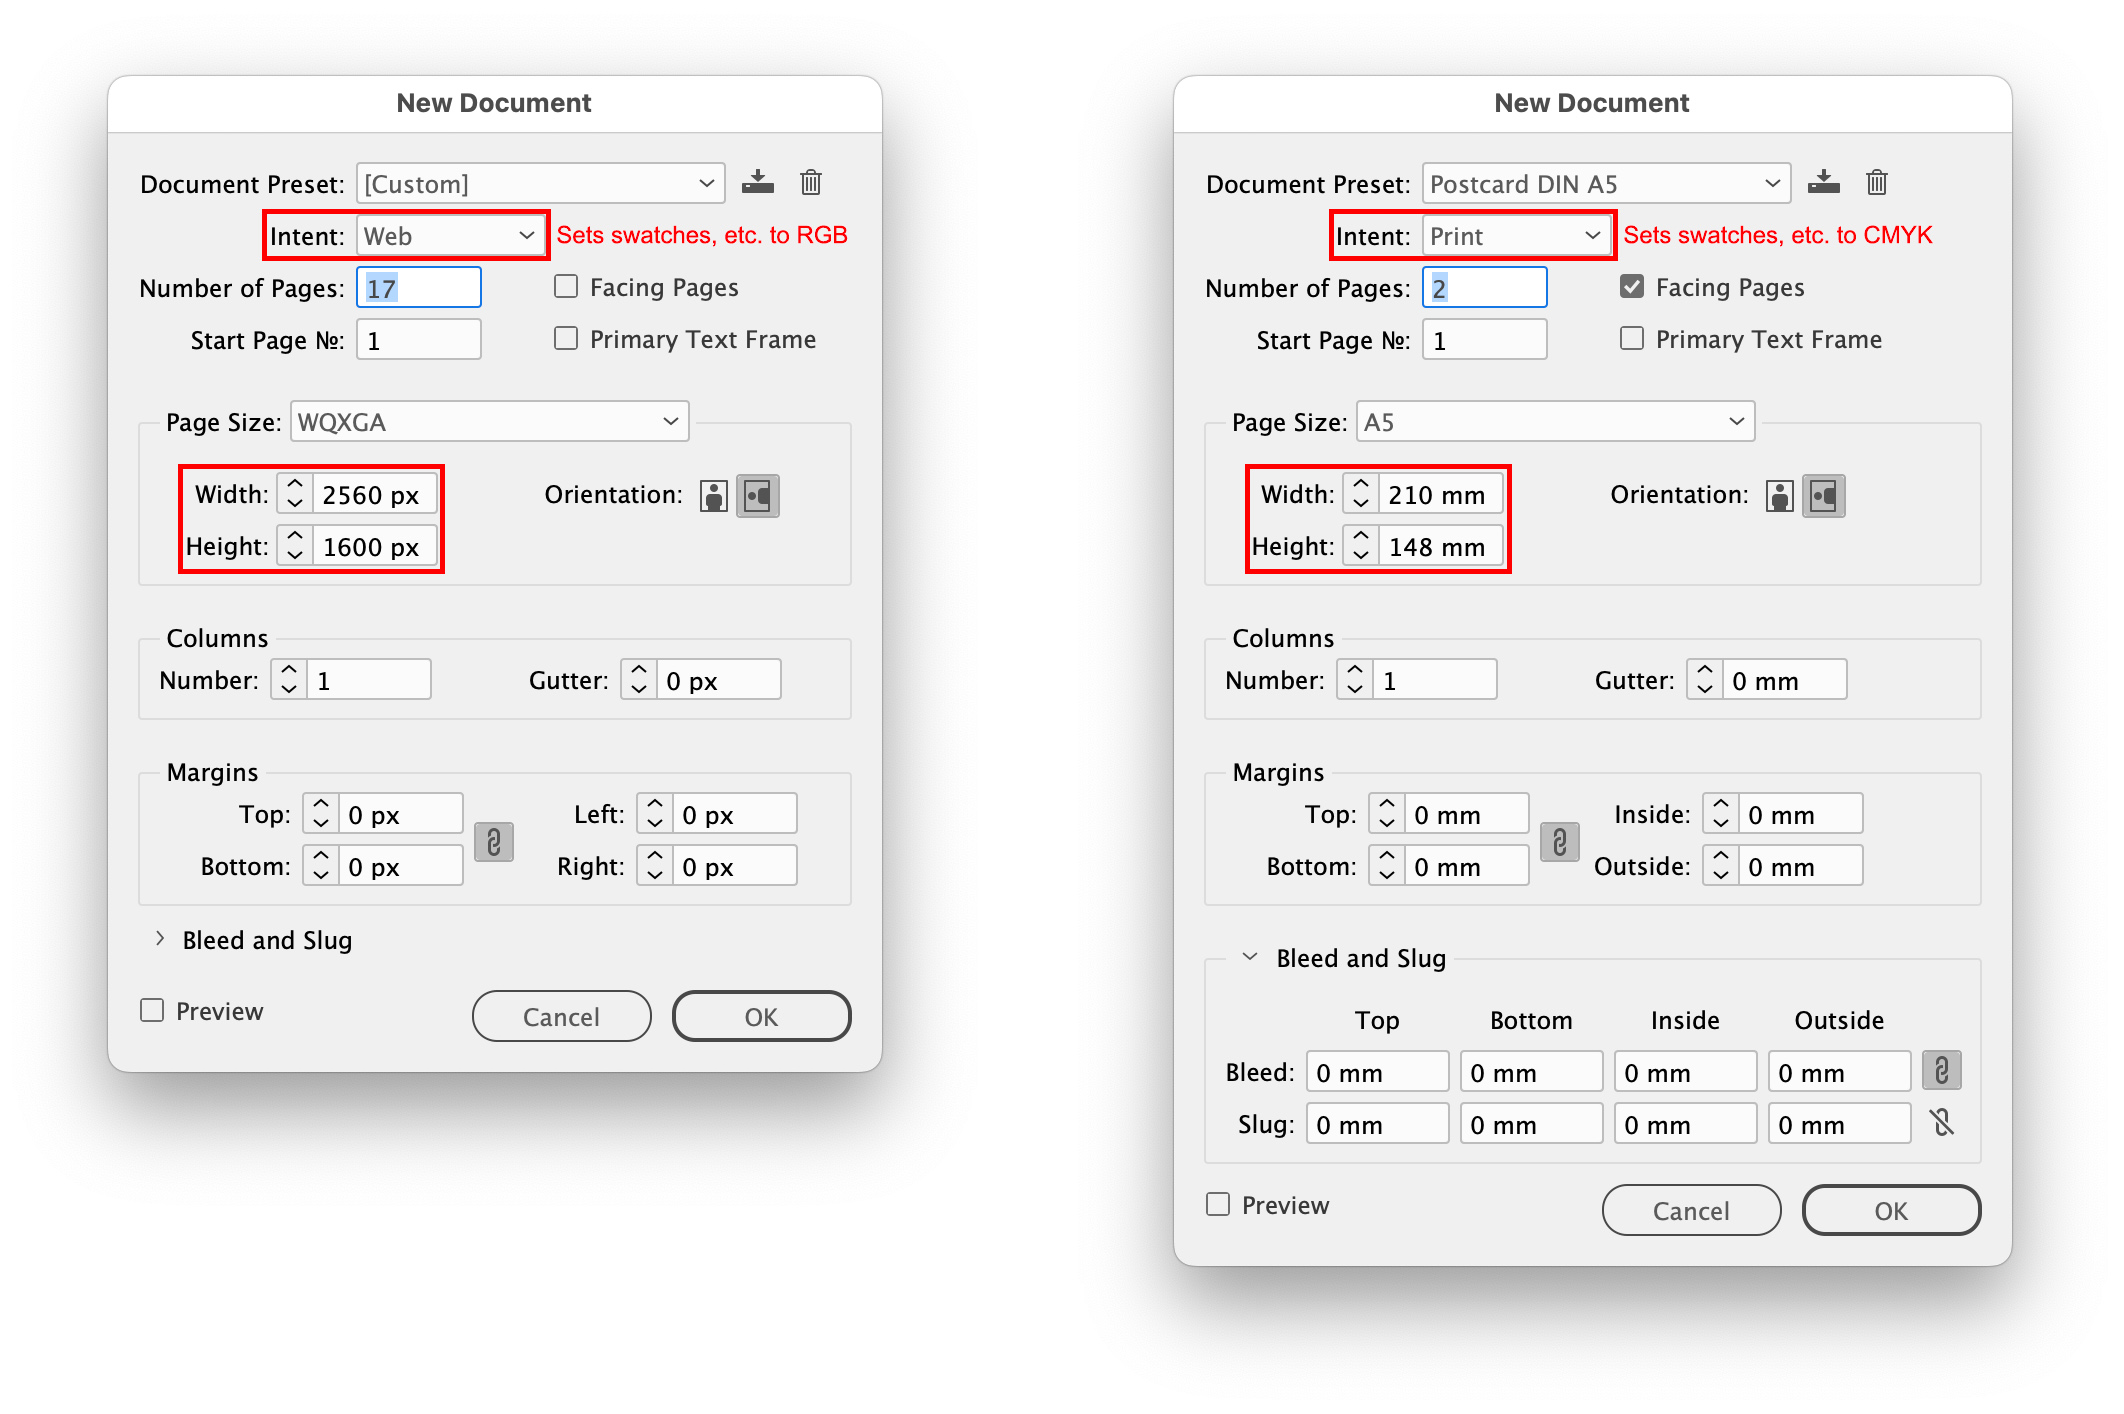
When you create a new document in Illustrator or InDesign; first think about what it will be used for, because that will determine which colour mode to use. RGB: Displayed on your own or someone else’s screen, online or offline, or with a projector. CMYK/spot colours: Printed matter like postcards, flyers, posters, brochures, etc.
Illustrator File > New…
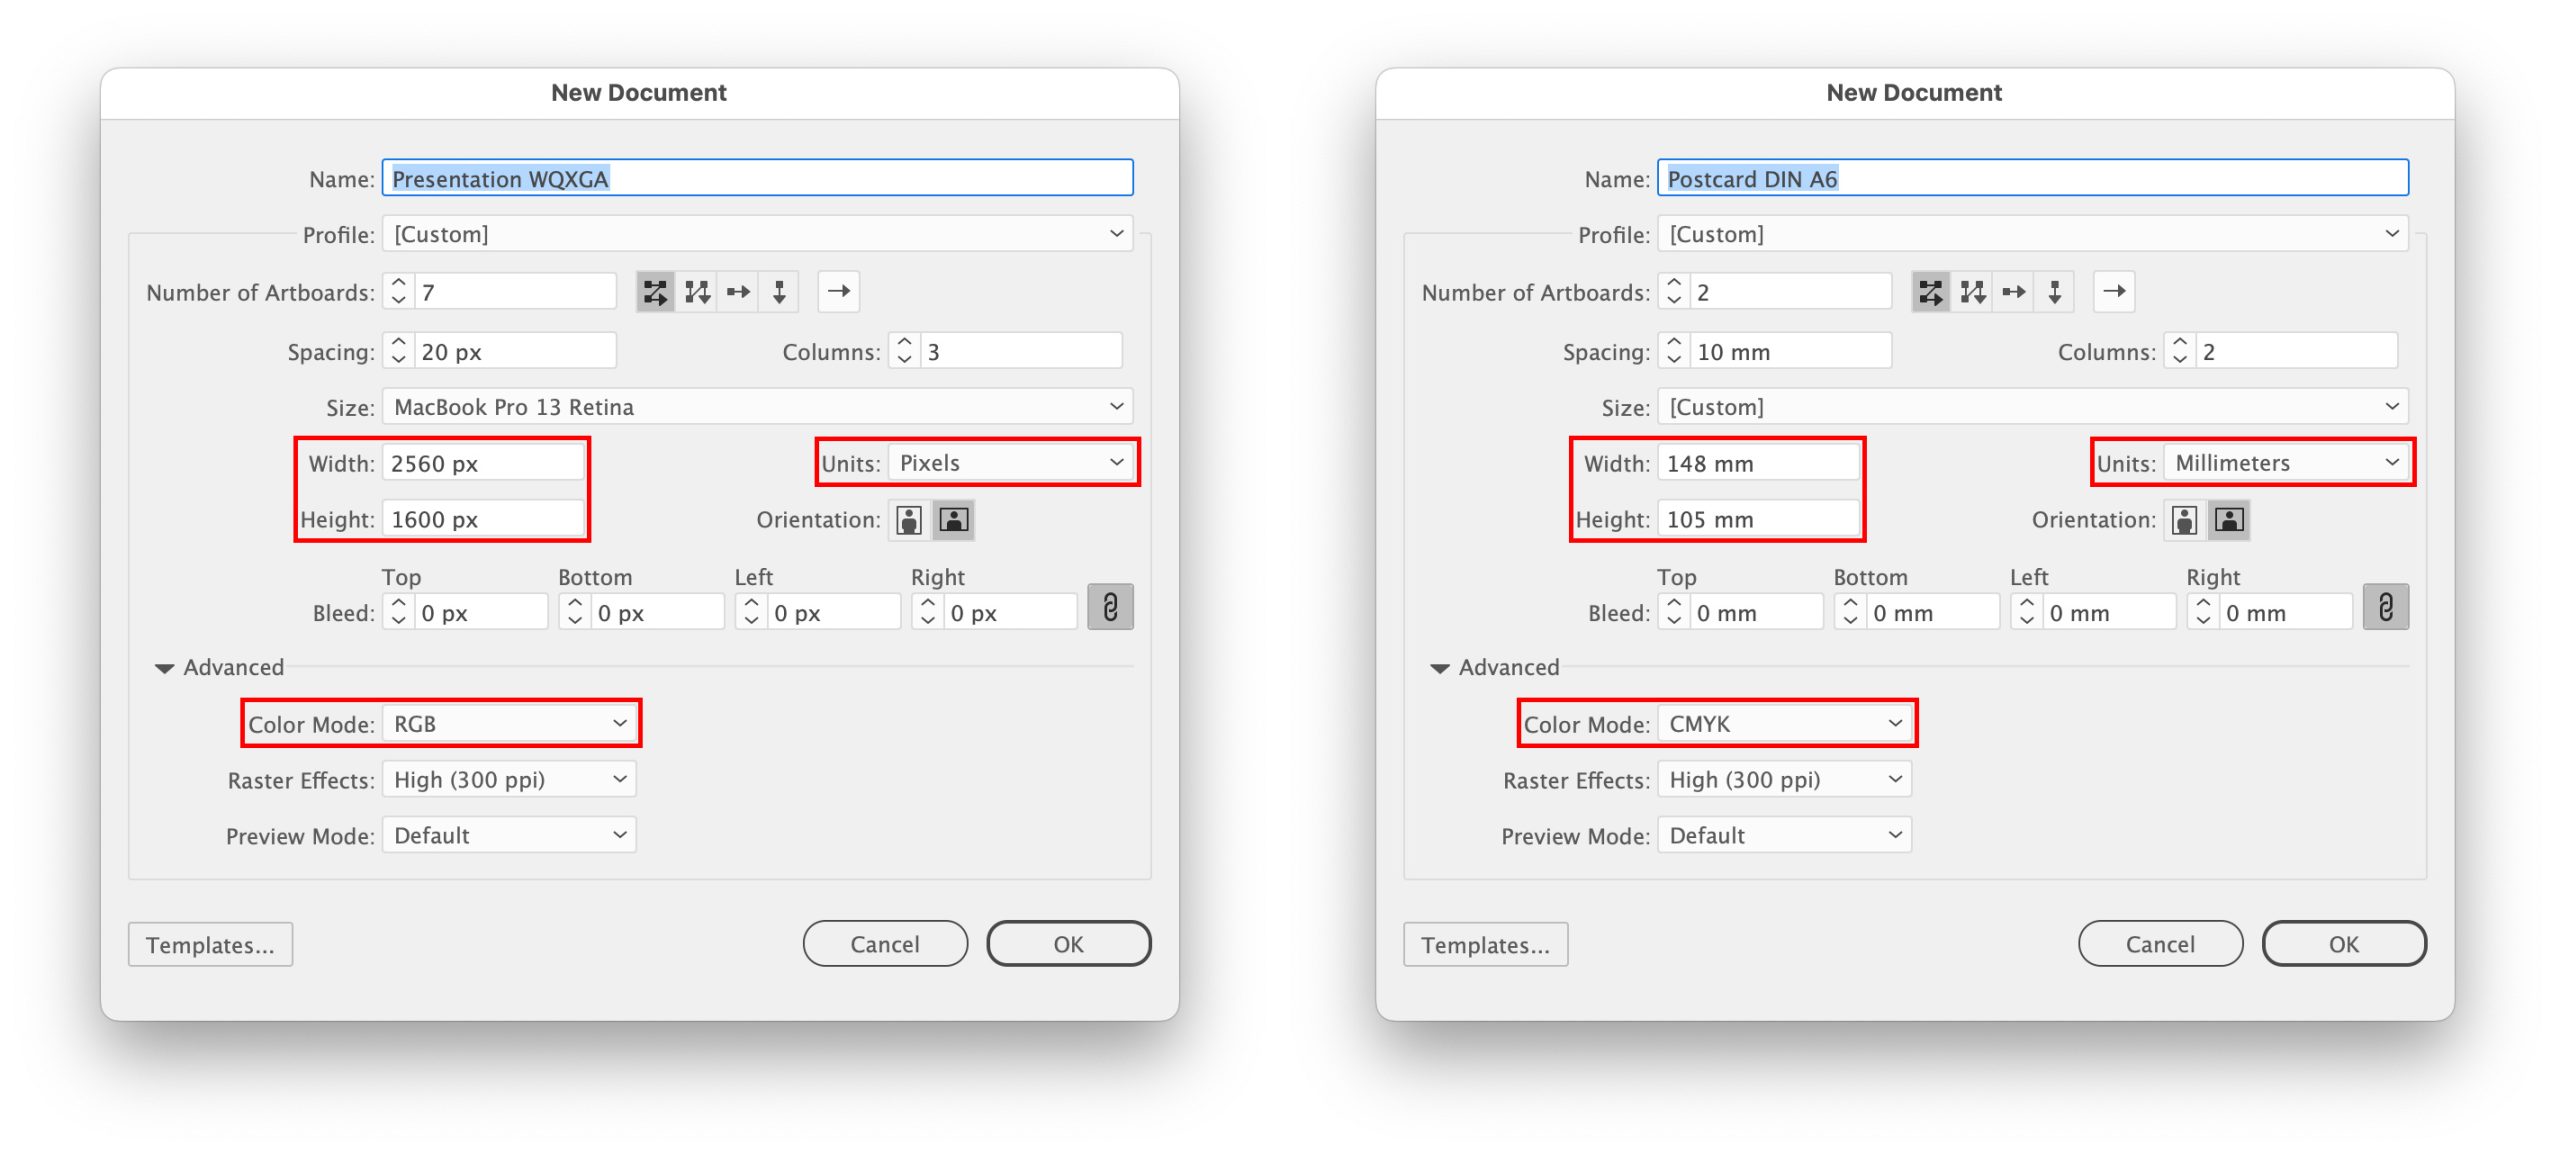
InDesign File > New > Document…
Saving a document
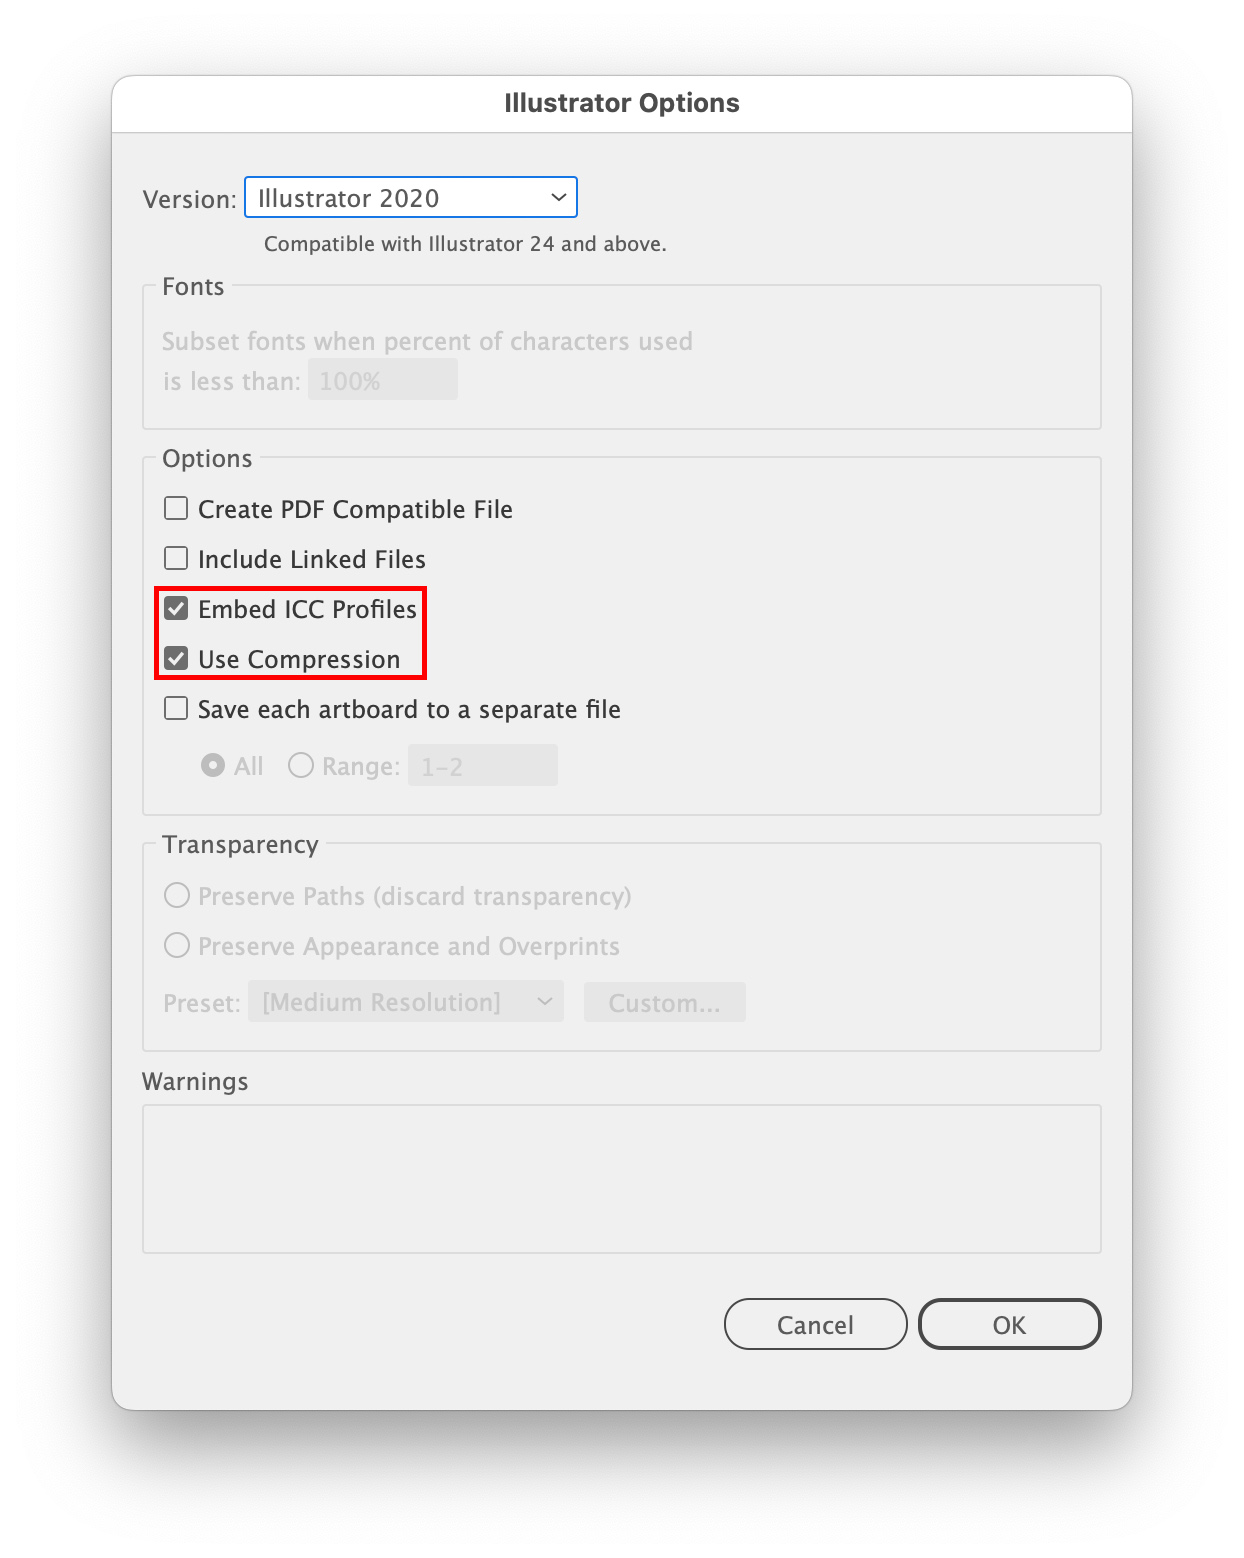
Illustrator File > Save As…
- Don’t select Create PDF Compatible File. The document’s file size will become unnecessarily large. You only need that option if you want to open and edit the Illustrator file in another Adobe CC application
- Don’t select Include Linked Files, because they would be embedded, see below
- Select Embed ICC Profiles to keep the document colour managed
- Select Use Compression for the smallest possible Illustrator file size
InDesign File > Save As…
- No settings required
Image types
You can mix JPEG and PNG files in your document. The PDF output module in Illustrator or InDesign will convert all images to JPEG anyway.
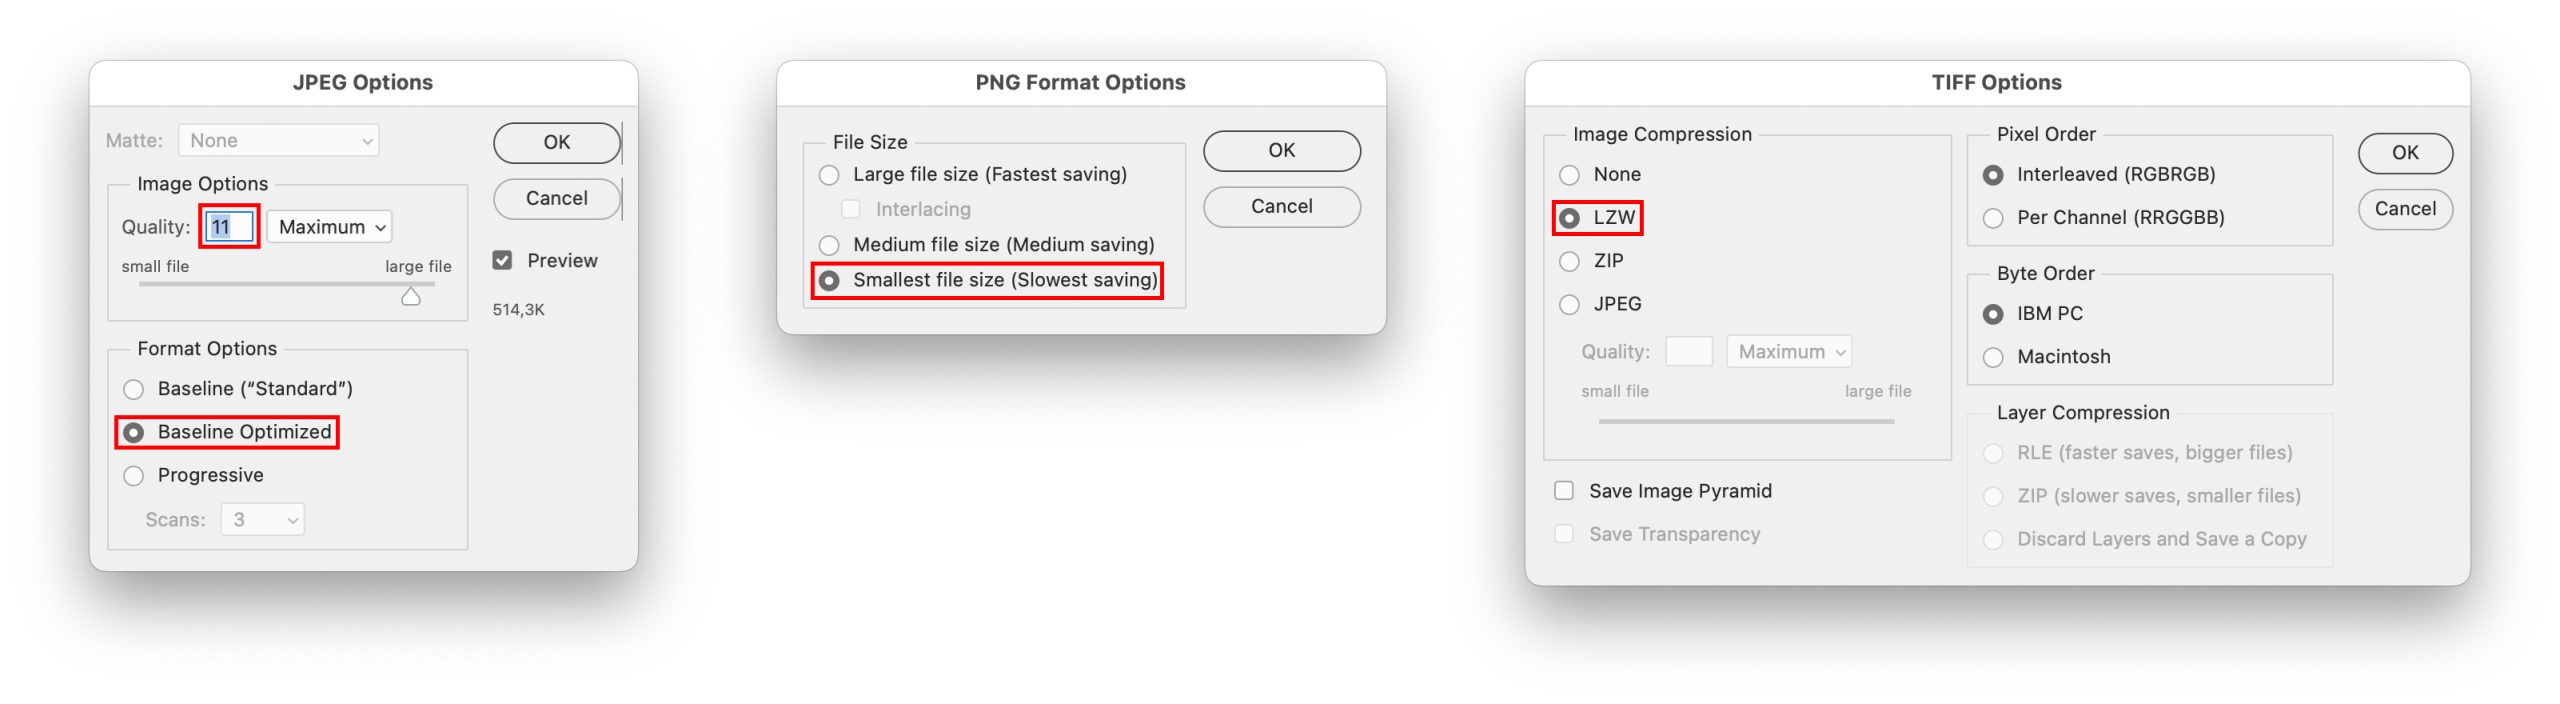
JPEG – lossy compression, small, colour profile can be embedded, supports CMYK and RGB colour. Use for presentations, email, and particularly online; use for print only if resolution is very high and compression is not too aggressive so that artifacts show. If your images have enough pixels (2K or more), a JPG saved in Photoshop with Image Options Quality: 9 or 11 and Format Options Baseline Optimized, results in a small file while still looking good (few or no visible JPG artifacts).
PNG – lossless compression, large, supports transparency, colour profile can be embedded, supports RGB colour only. Use if you need transparency for website and app designs. Although larger than JPEG files, the PDF output module in Illustrator and InDesign will convert PNGs to JPEGs anyway, so don’t “pre-convert” your PNGs to JPEG in Photoshop if you want the best possible PDF image quality.
TIFF – lossless compression, very large, supports transparency, colour profile can be embedded, supports CMYK/spot colour and RGB colour. Use for printing.
HEIC – Apple’s iOS proprietary lossy compression format that results in smaller files than JPEG. Photoshop can open HEIC files. The default resolution is 4032 x 3024 px (iPhone 12, 13 and 14). To directly transfer them to your laptop already converted to JPEG, set TRANSFER TO MAC OR PC in the Photos app settings to Automatic. If you want to directly take JPEG photos instead of HEIC photos, set CAMERA CAPTURE in Camera > Formats settings to Most compatible.
Inserting images
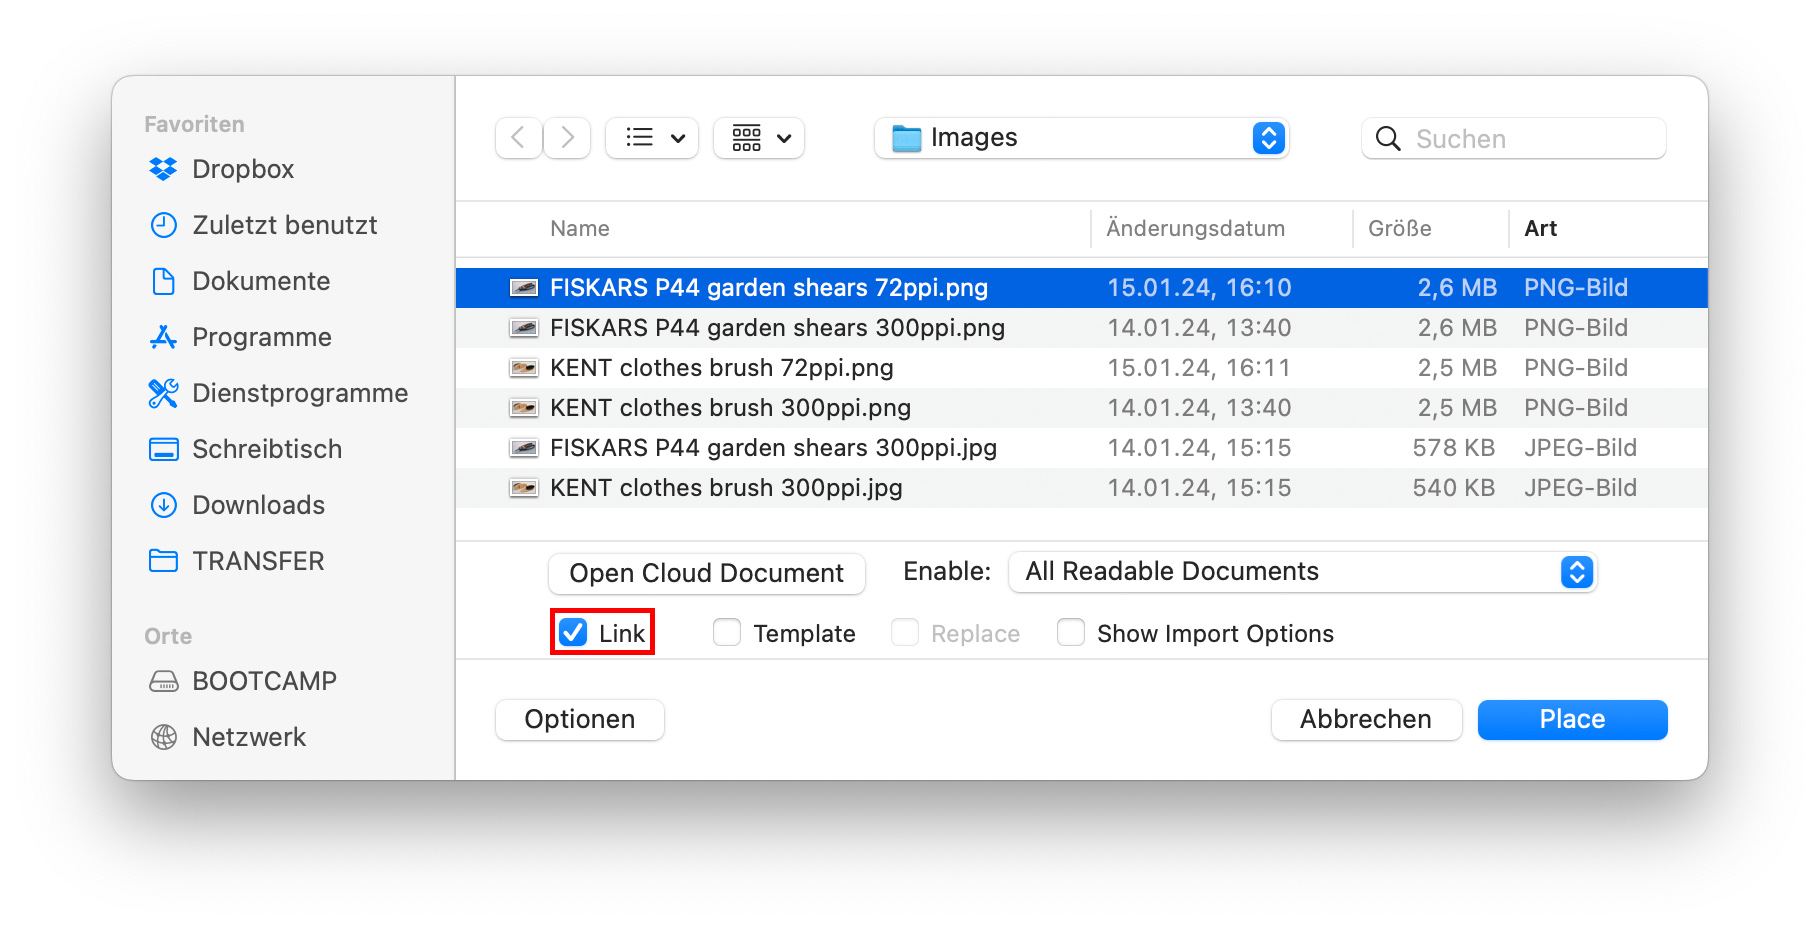
File > Place…
- Select Link to avoid file embedding (InDesign always links automatically). Otherwise, the Illustrator or InDesign document size becomes huge, making switching layers and scrolling slow. Also don’t drag images from your desktop, they will be embedded, not linked.
Pixels, resolution, and scale
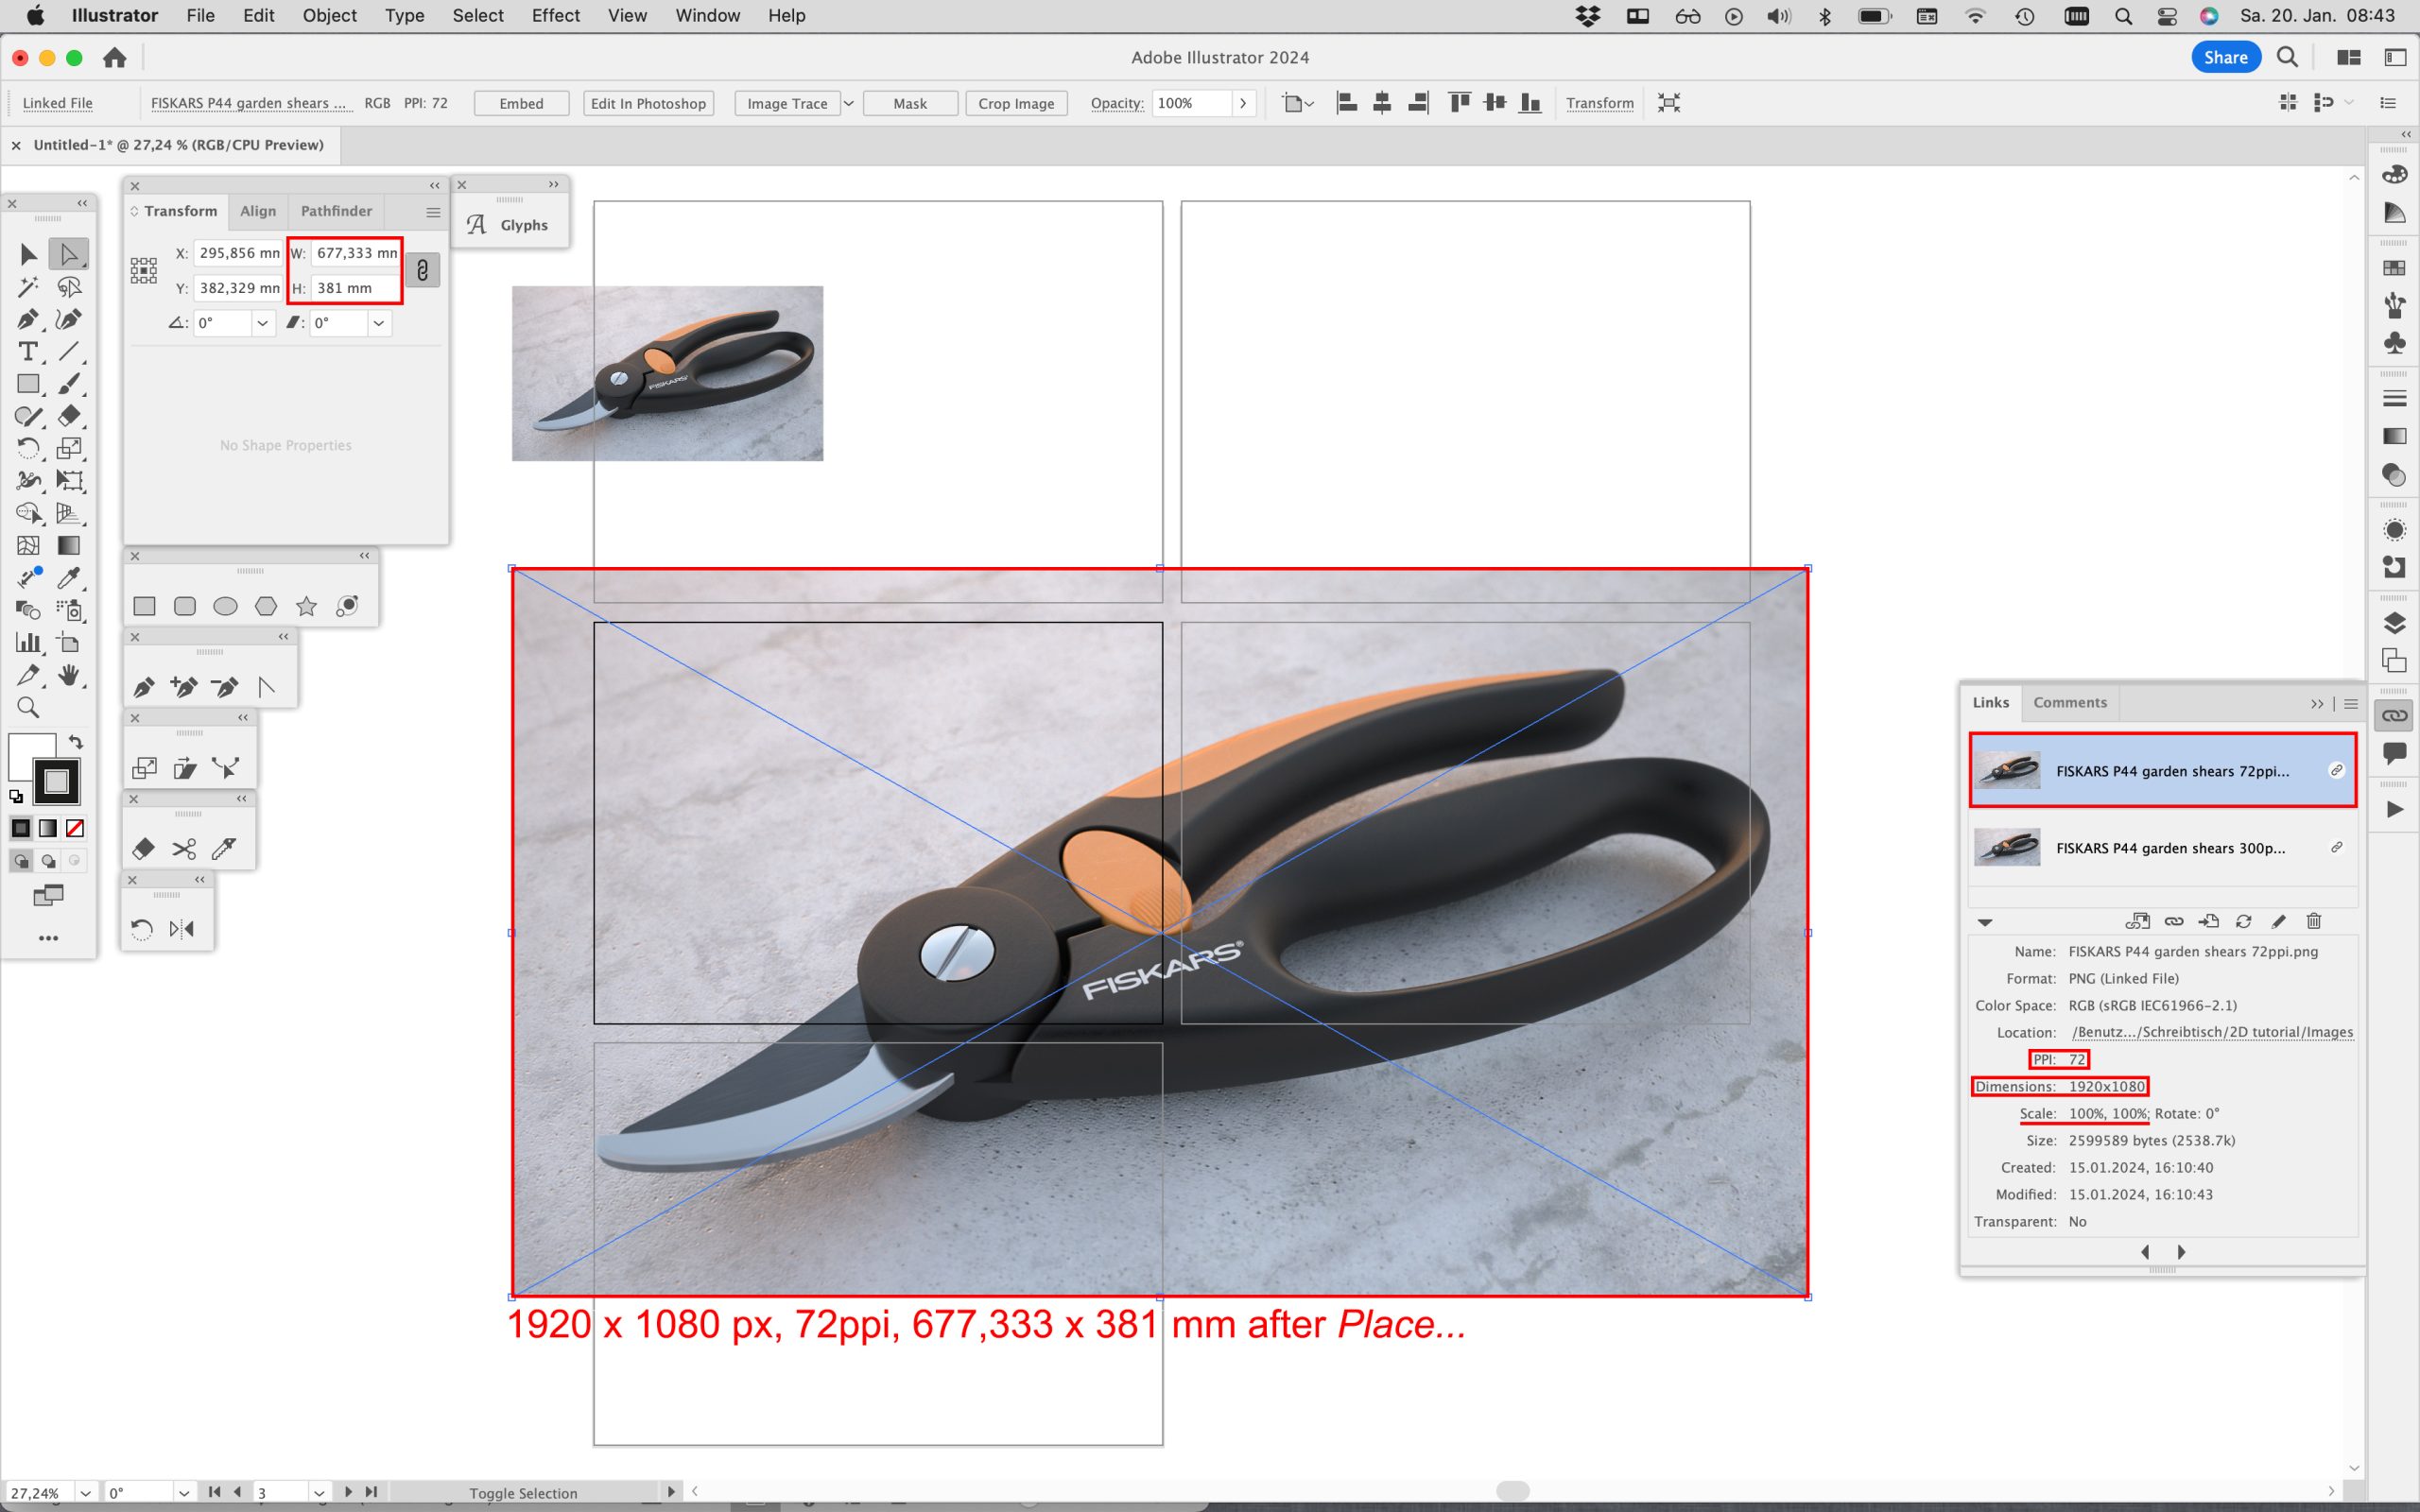
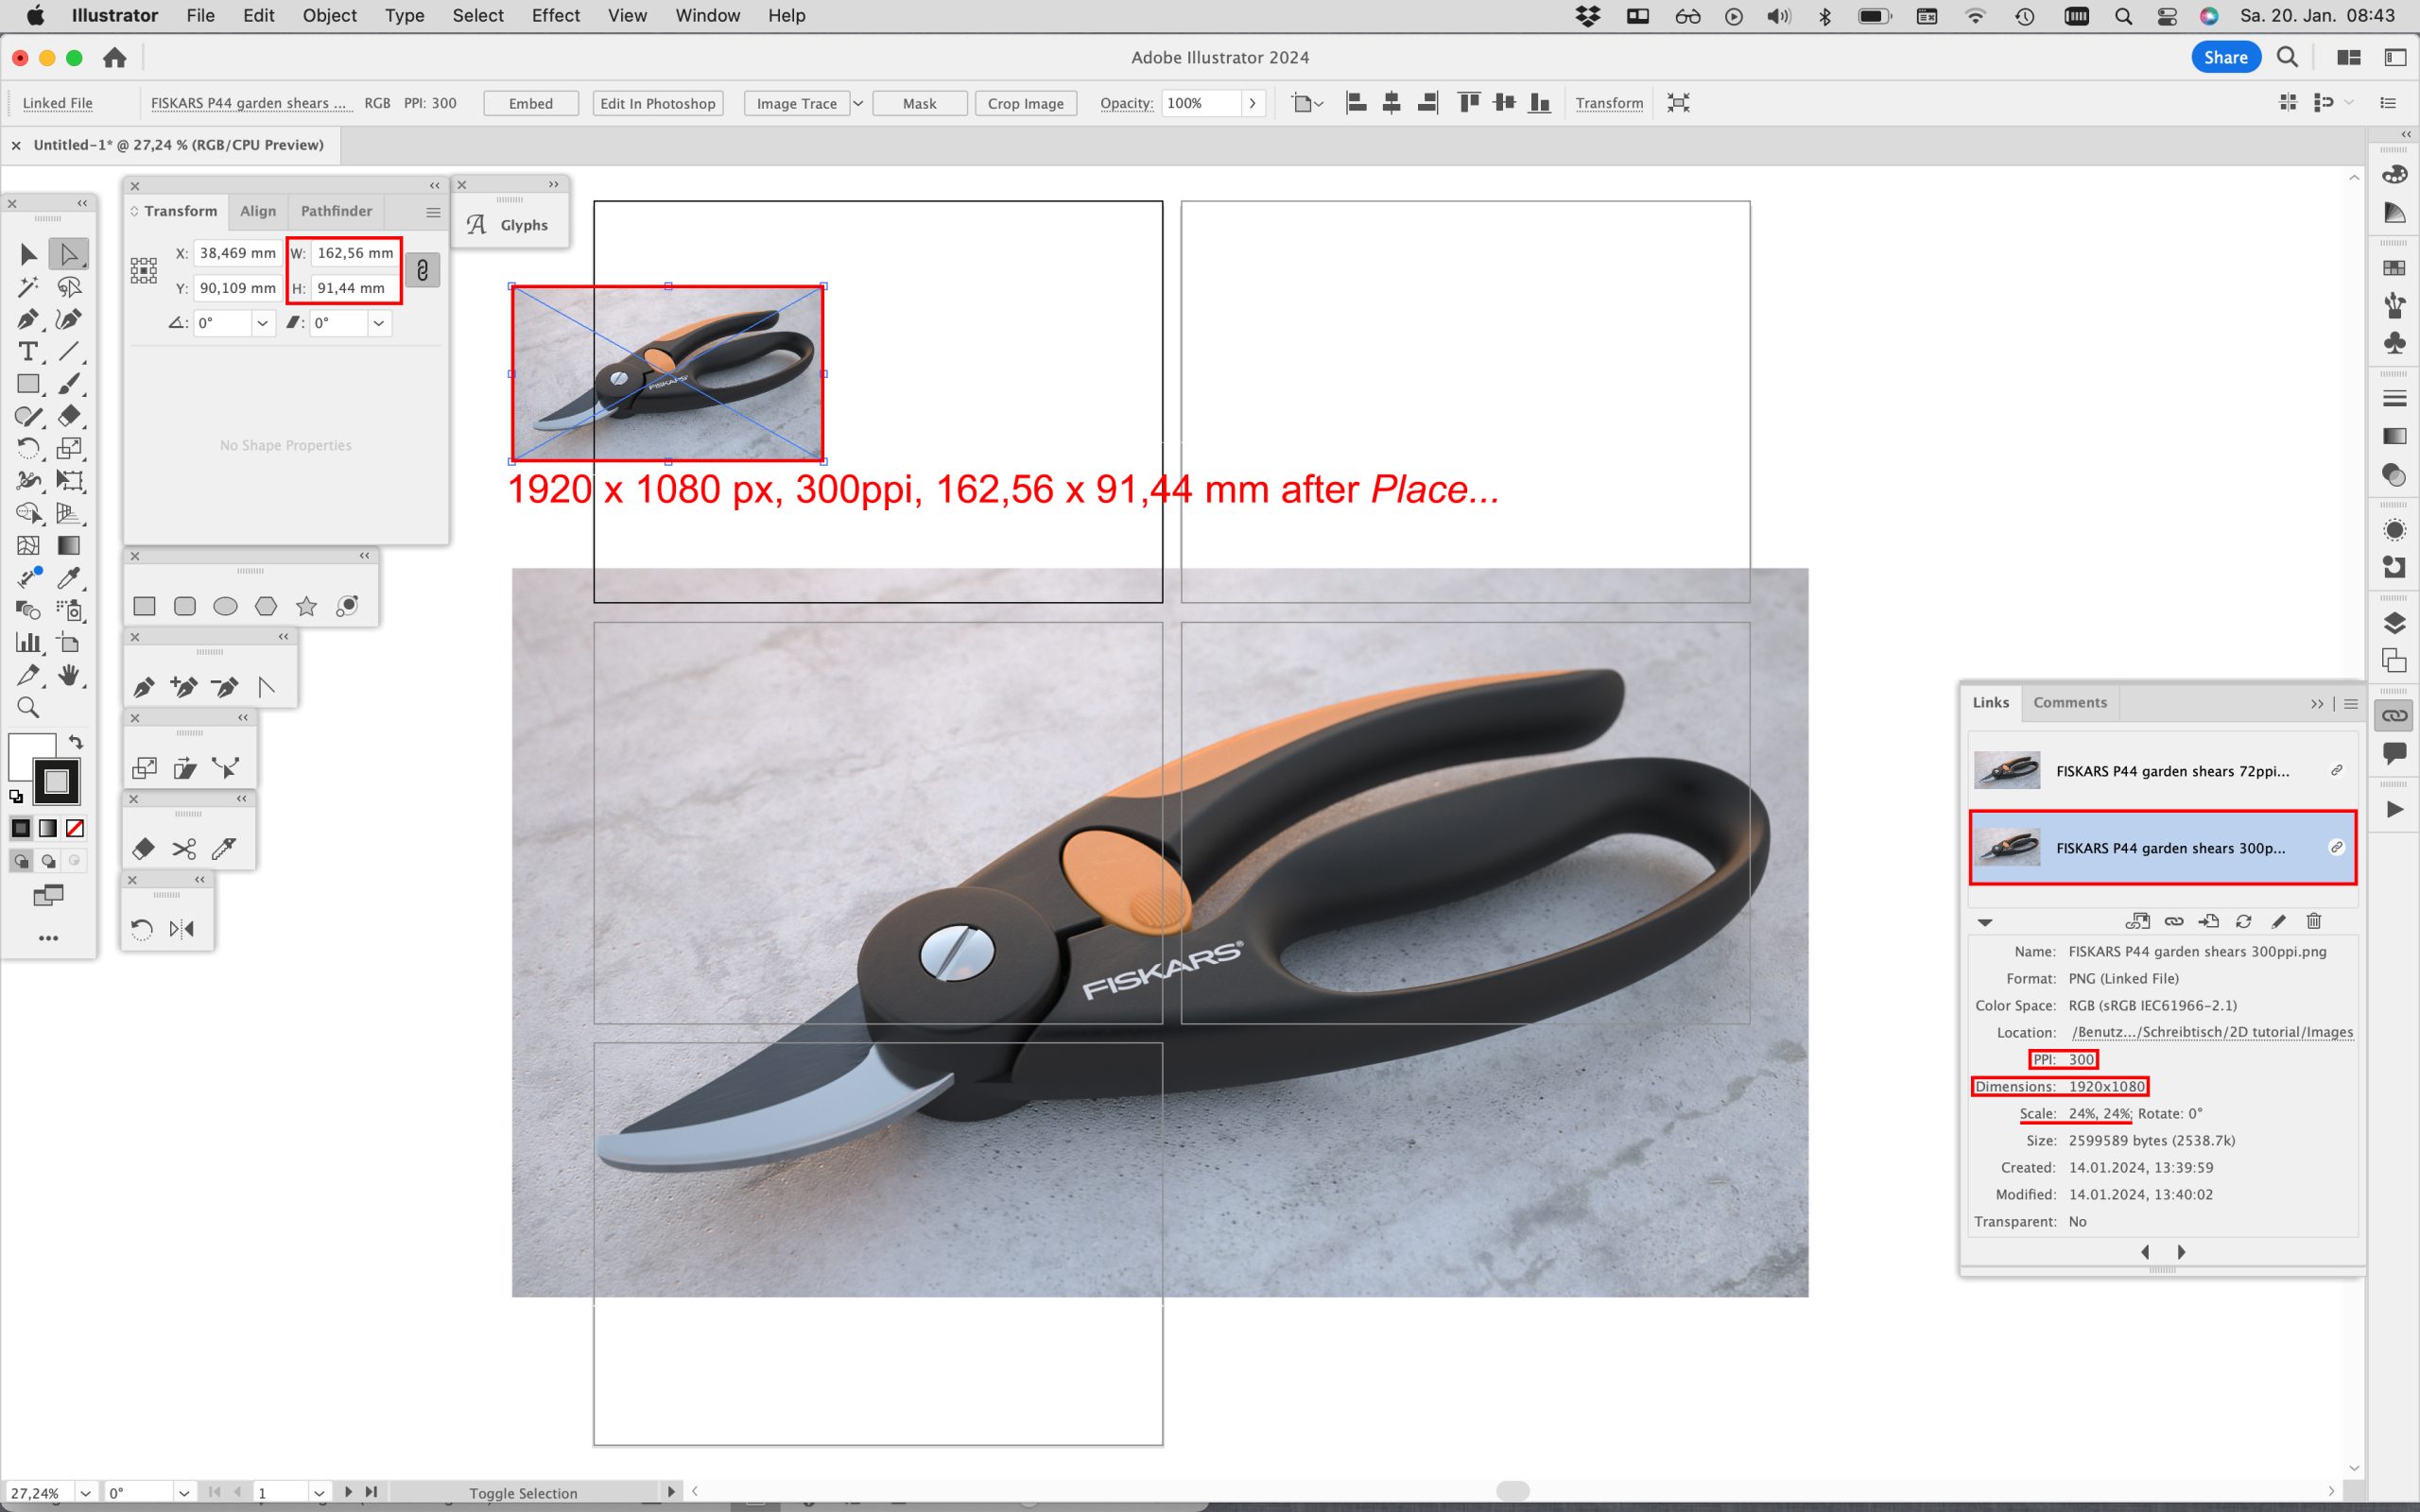
The visual quality of an image in an Illustrator or InDesign document (and thus PDF) depends on how many pixels it has, the more, the better. It is irrelevant if, for example, an HD rendering (1920 x 1080 px) was saved at 72ppi or 300ppi resolution in Photoshop – the number of pixels remains the same! When placed, a 72ppi PNG or JPEG will appear large, while a 300ppi PNG or JPEG will appear small, but they contain the exact same pixel information! Next, you will want to scale to the desired size.
When placing an image, you will see that a 72ppi image has a scale of 100%, while a 300ppi image has a scale of 24%. You may wonder: 24% scale of what? It means 24% of if it were 72ppi, the traditional default resolution for screen displays that most 2D software still adheres to (meaningless today because your laptop’s or smartphone’s resolution is much higher).
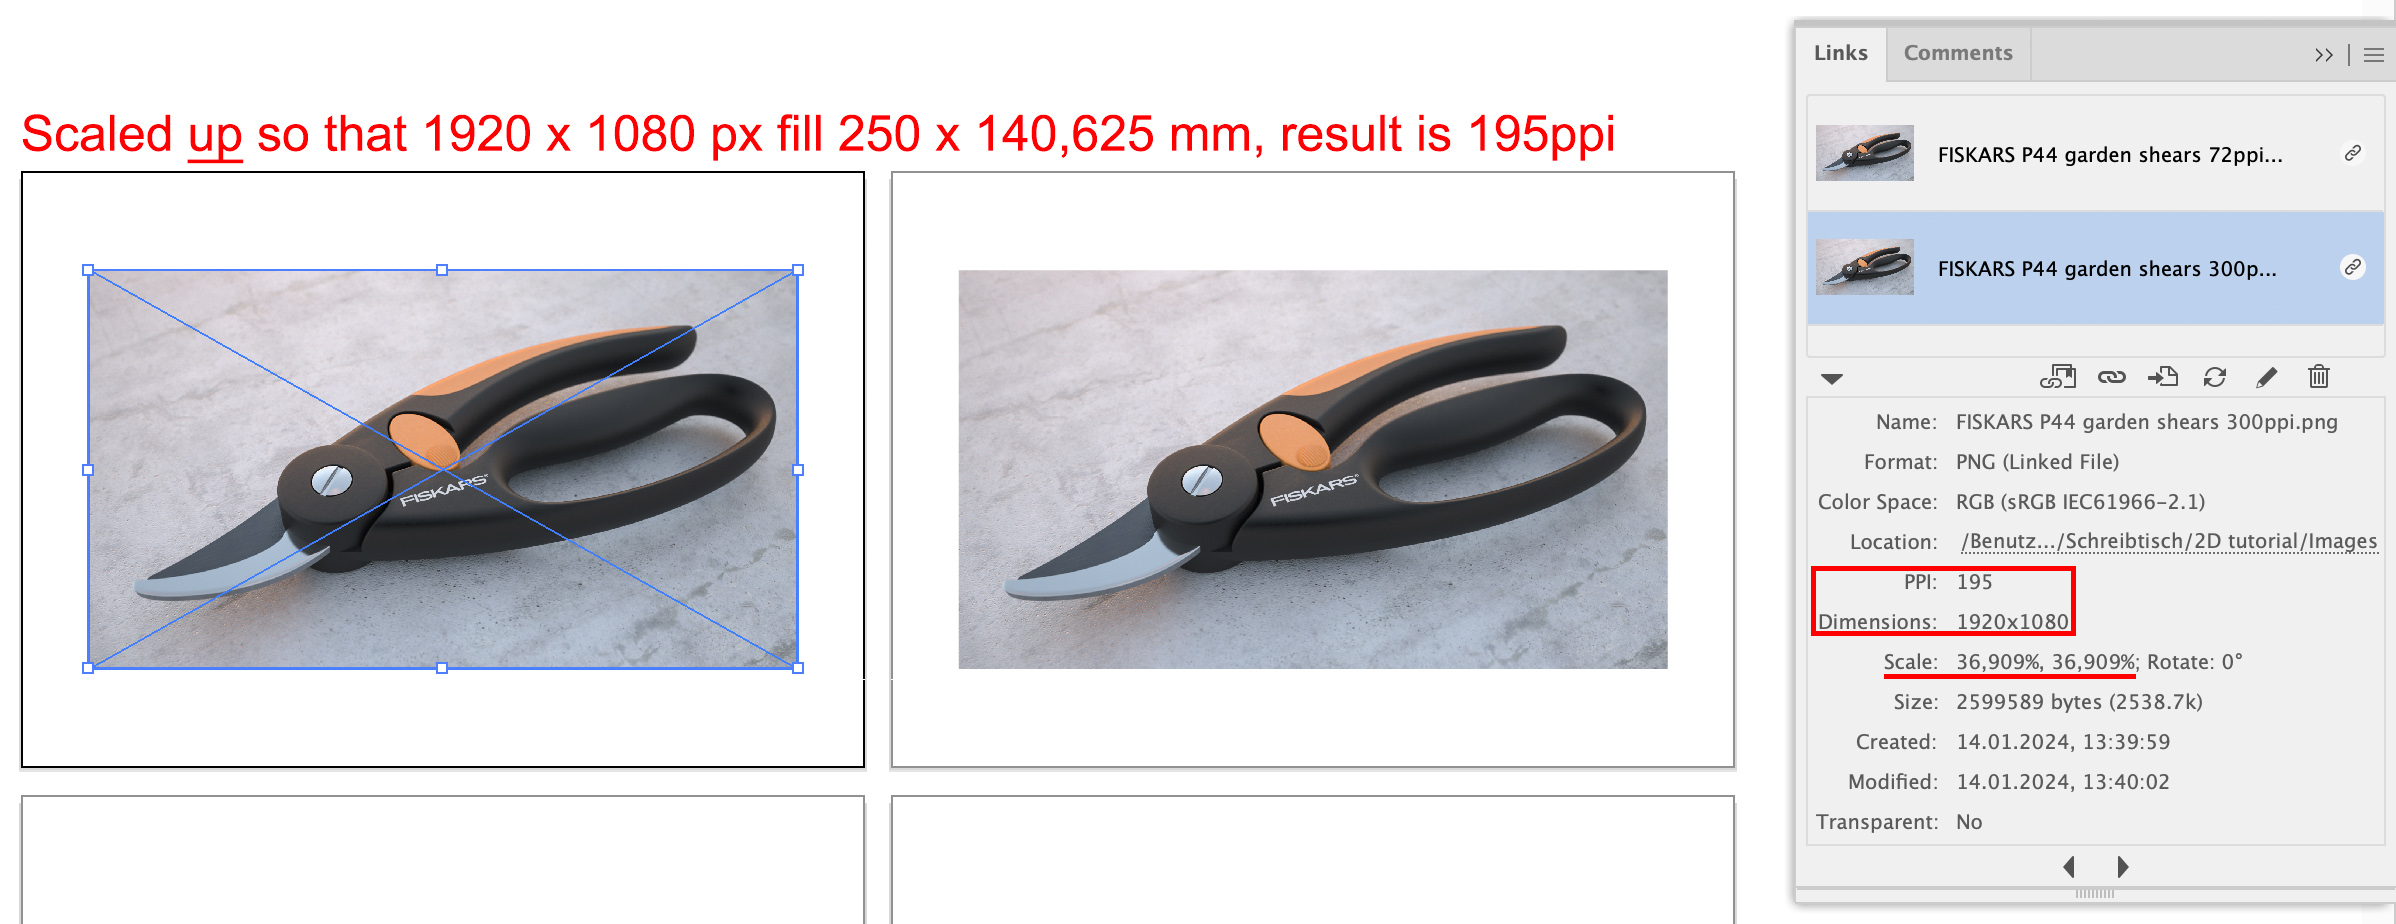
Scaled up/down to the same size (in mm or cm), however, both will have the same effective output resolution ppi value (in both Illustrator and InDesign. To see for yourself, select the 72ppi and 300ppi version of a placed image, then click on the Links tab, then on the Show Link Info icon at the bottom left – the same number of pixels is “squeezed” into the same area. In short, it’s the pixels that matter, and to what area they are fitted, when you scale an image up or down.

Google’s default search for images often yields too low-resolution images for moodboards, competitor analyses, etc., even with the Large option selected. Much better is Google’s Advanced Image Search, where under Find images with… you have more detailed search term options, and where under Then narrow your results by… you can set image size: to values of 2K and higher values. Online sourced images are often 72ppi or 96ppi, so once linked into your document, you need to scale them down to fit in your layout.
Creating a preset for saving lightweight PDFs
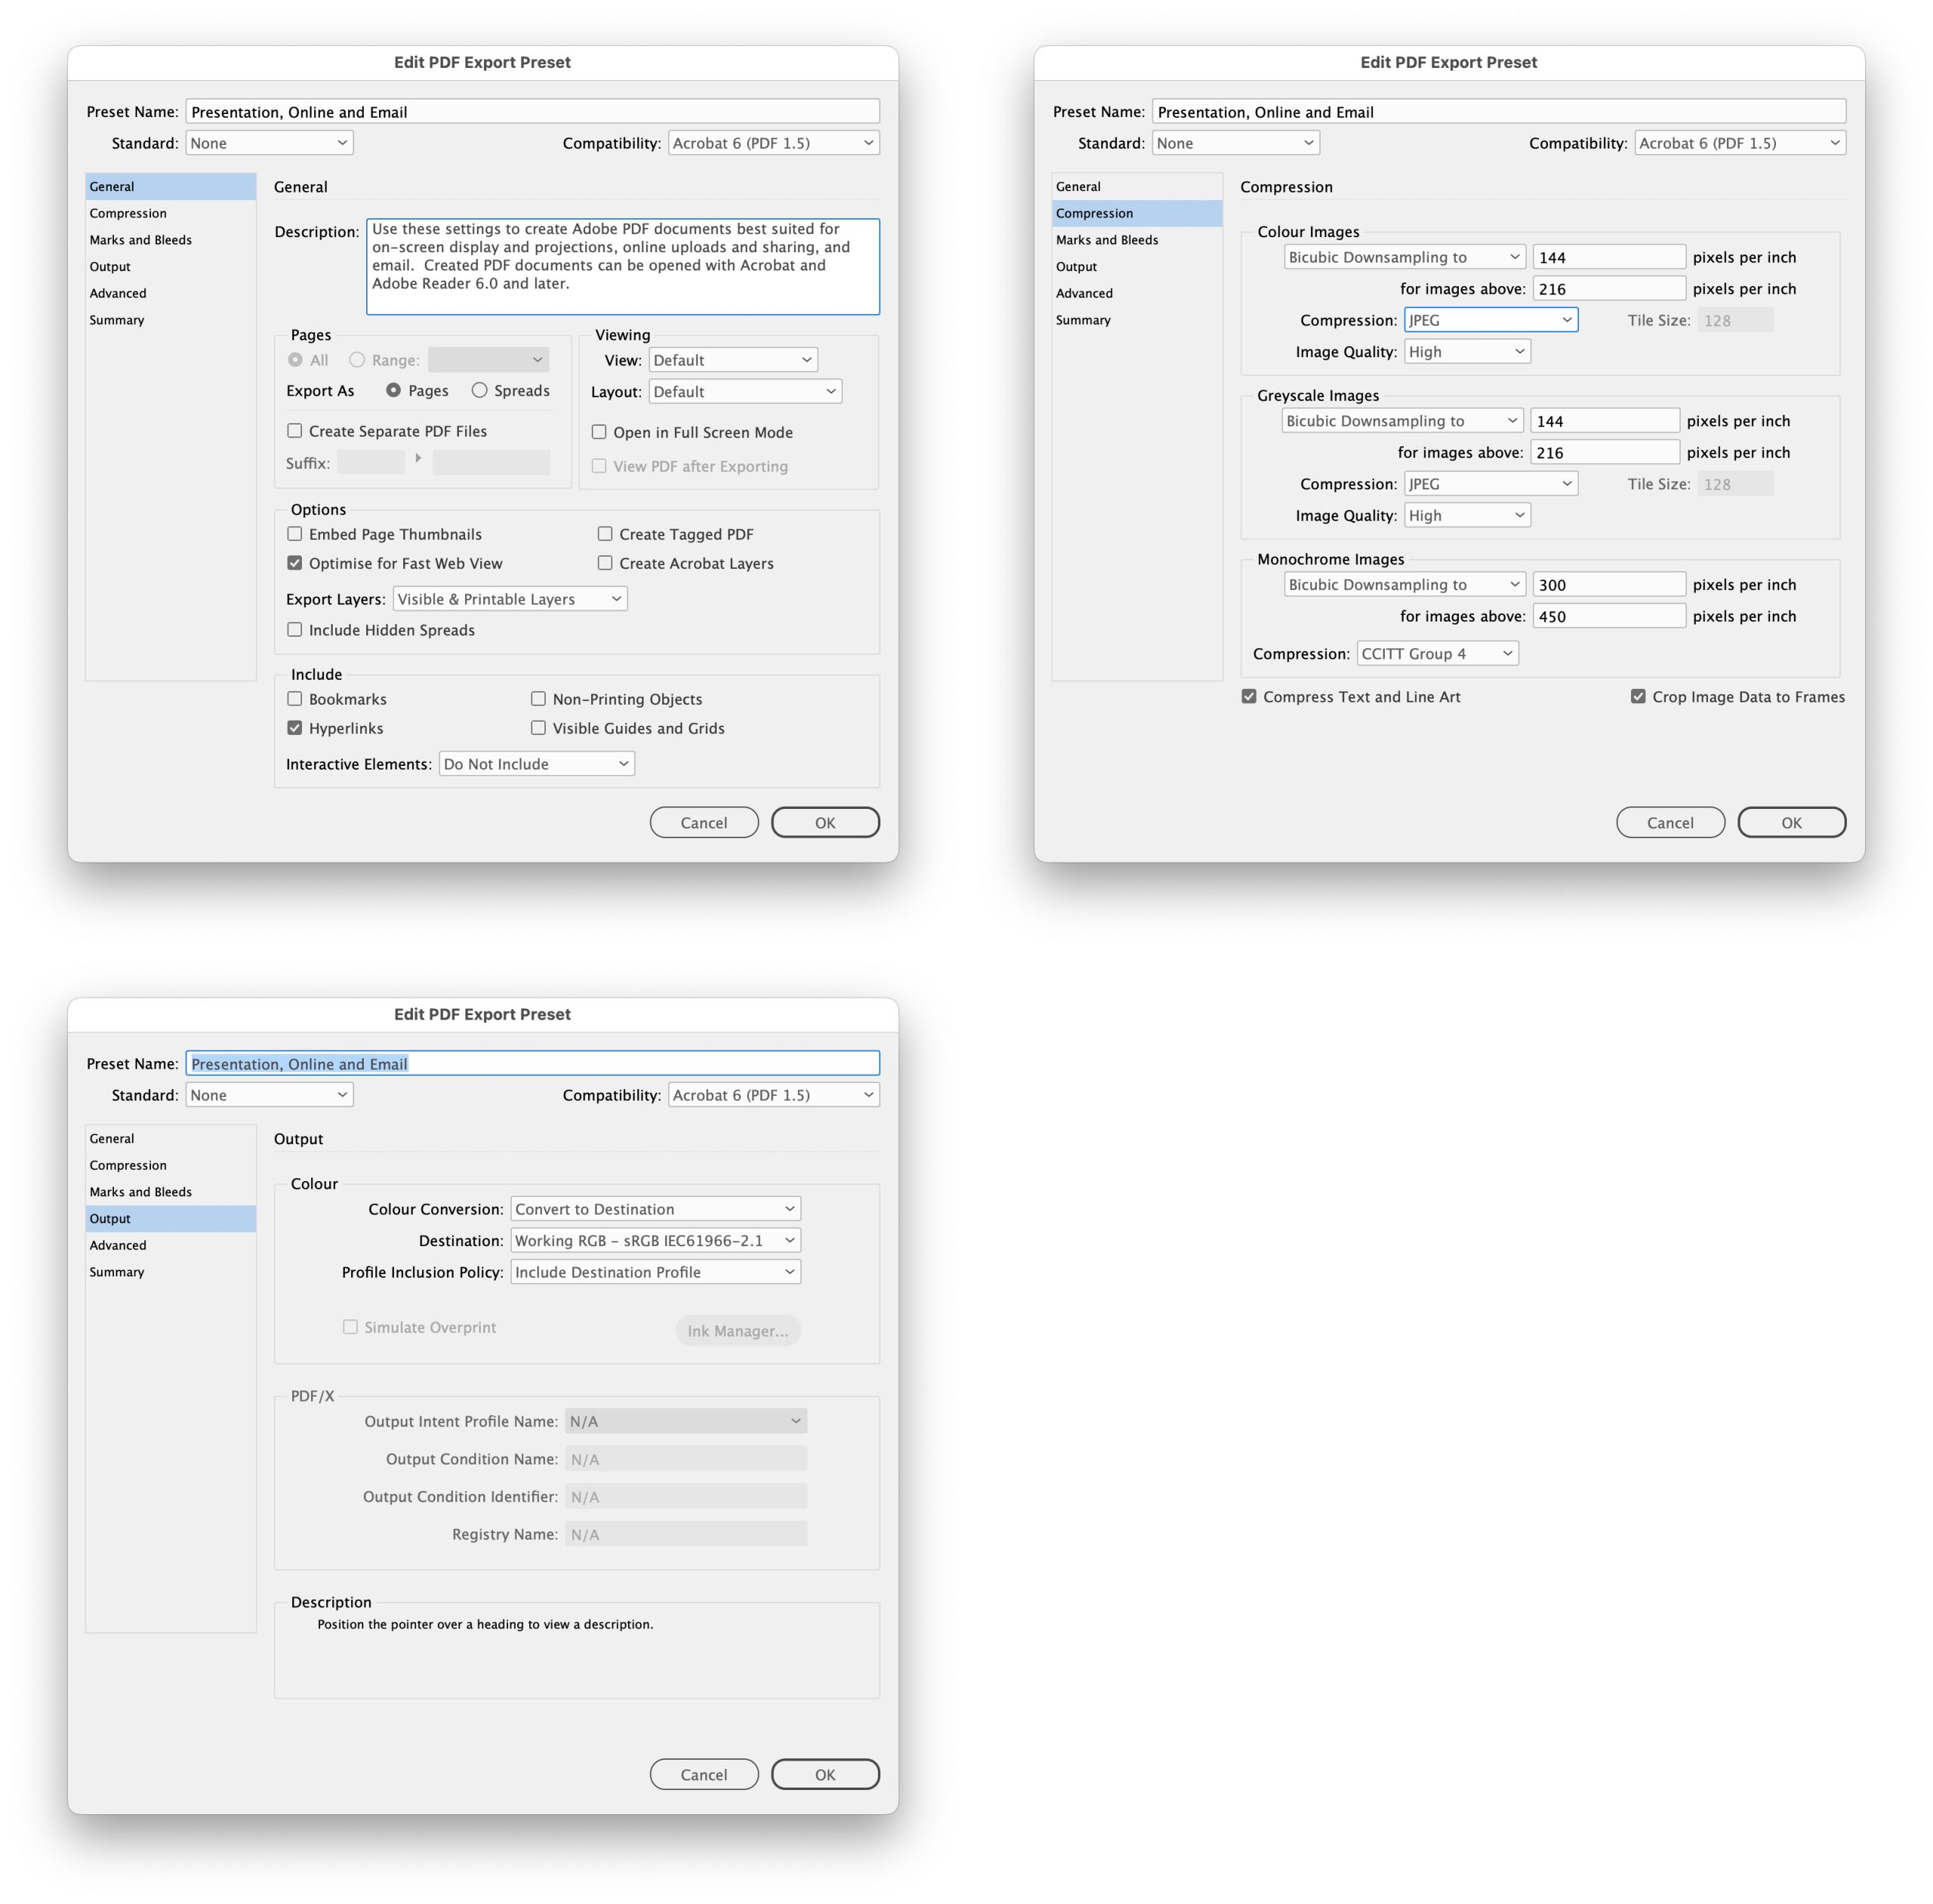
The best thing to do, instead of remembering settings and values, is to create a preset. You can also create a preset for printing, but that’s another topic.
Illustrator Edit > Adobe PDF Presets…
- Select [Smallest File Size] and click the + icon, rename Presentation, Online and Email
- General select Optimize for fast Web View and Preserve Hyperlinks only
- Compression both Color and Grayscale Bitmap Images use 144 ppi for images above 216 ppi and for Compression: select JPEG and Image Quality: High for both also
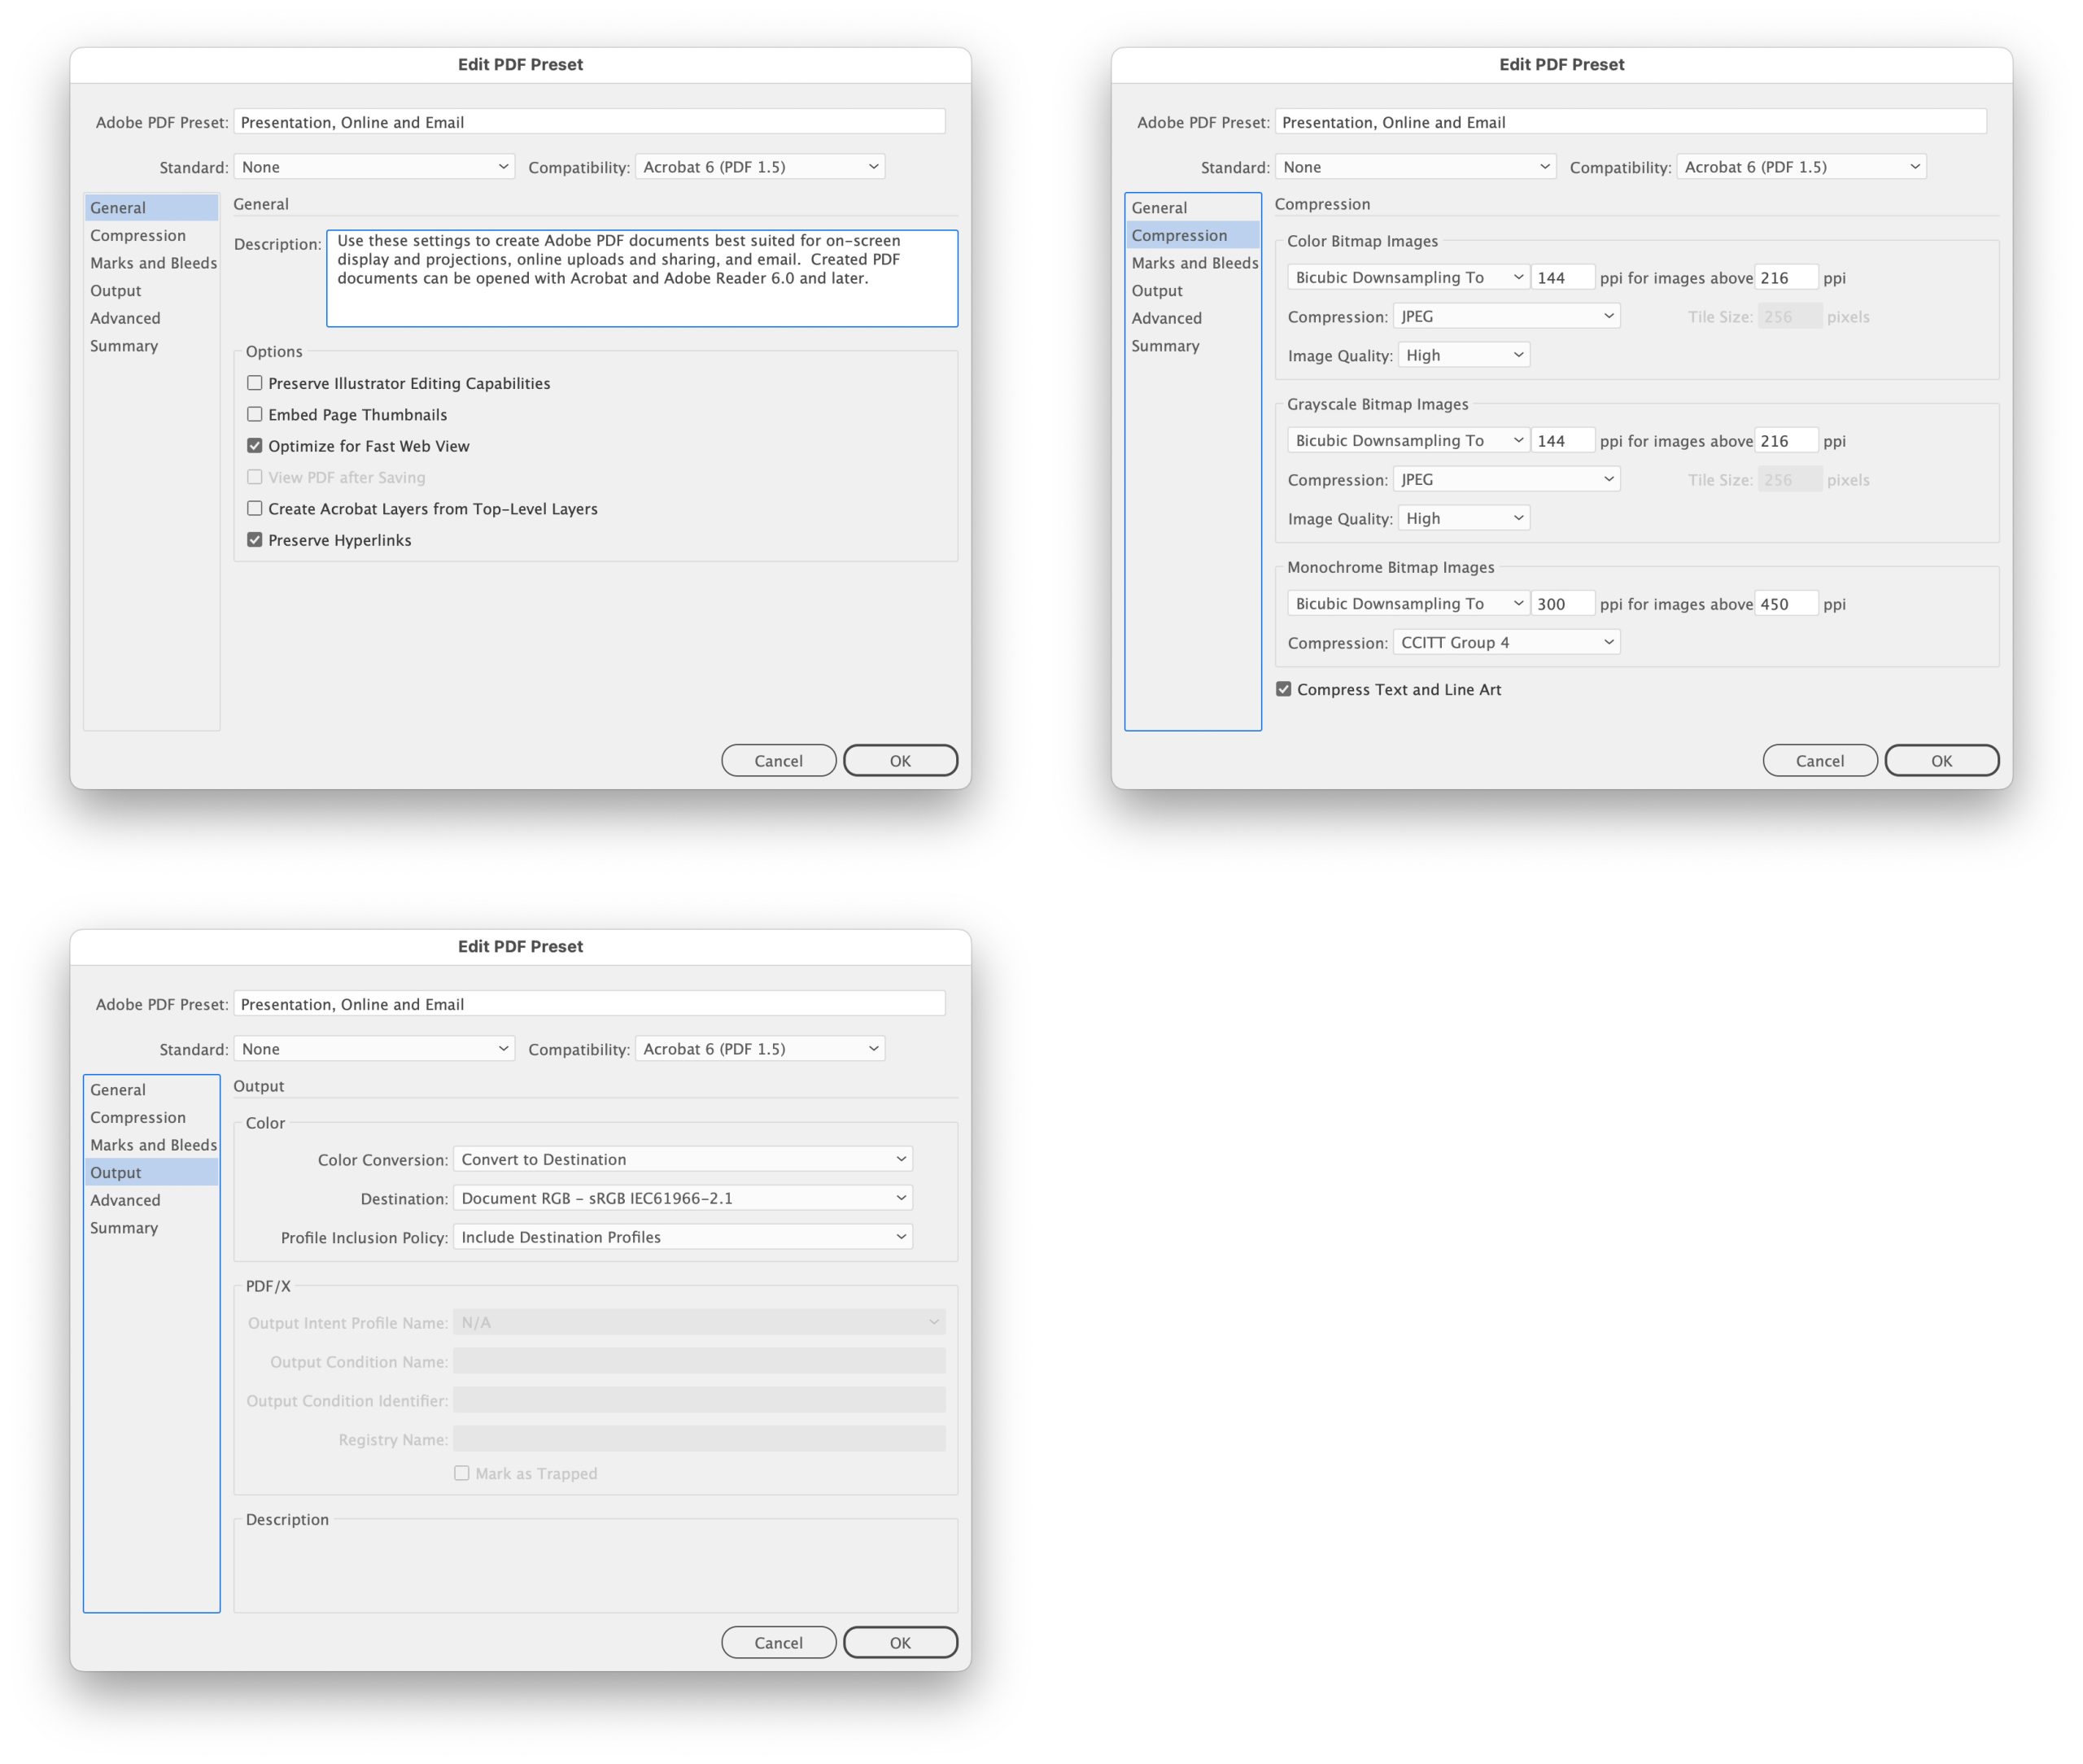
InDesign File > Adobe PDF Presets > Define…
- Same settings as in Illustrator
Saving Illustrator artboards as PDF
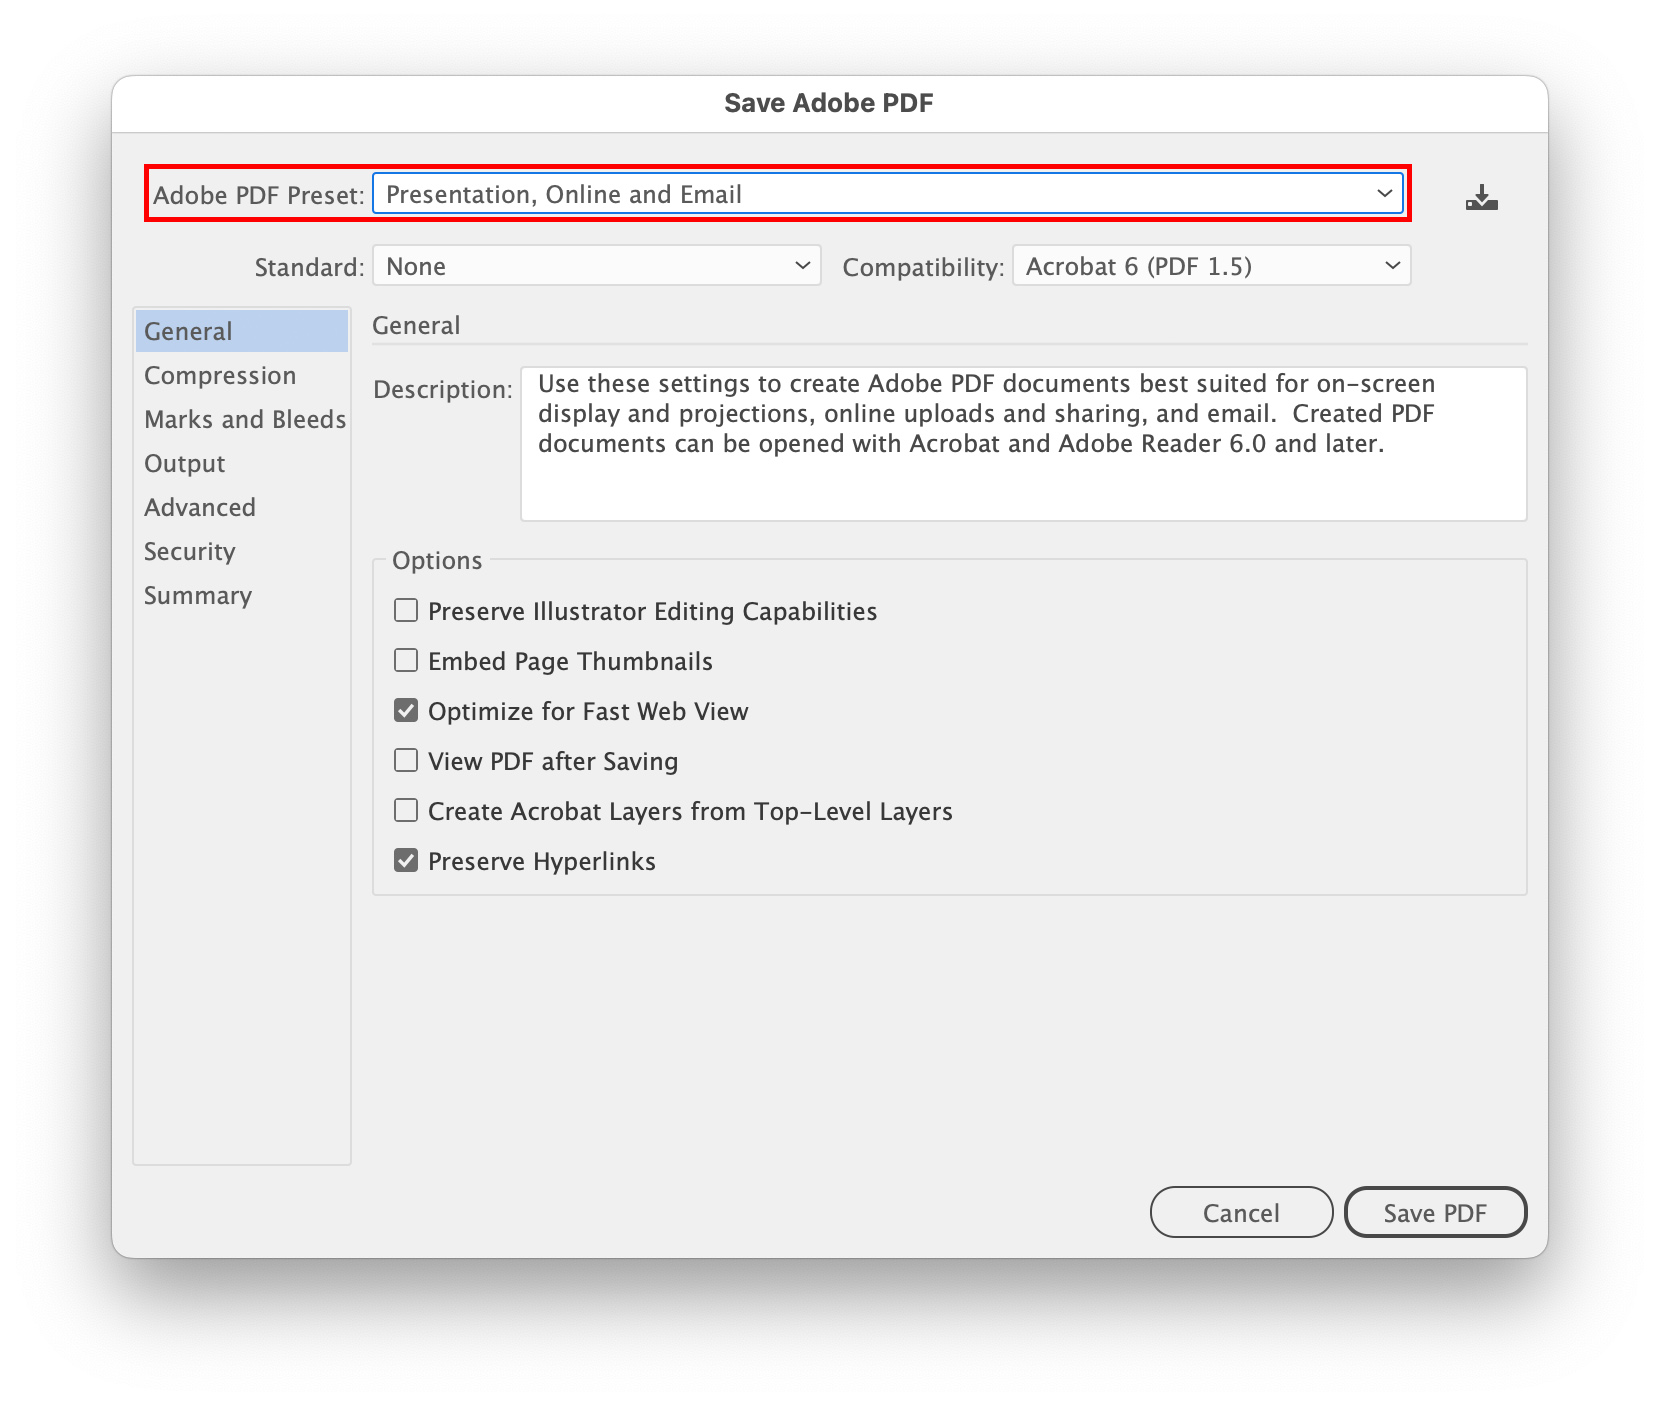
Single PDF file File > Save A Copy…
- Saving a copy prevents your original editable Illustrator file from being overwritten accidentally
- Select Adobe PDF (pdf) and click Save
- Select All or Range (for example 4-9, or 1-3, 10-16 for discontinuous ranges)
- Select the Adobe PDF Preset Presentation, Online and Email preset
- Click Save PDF
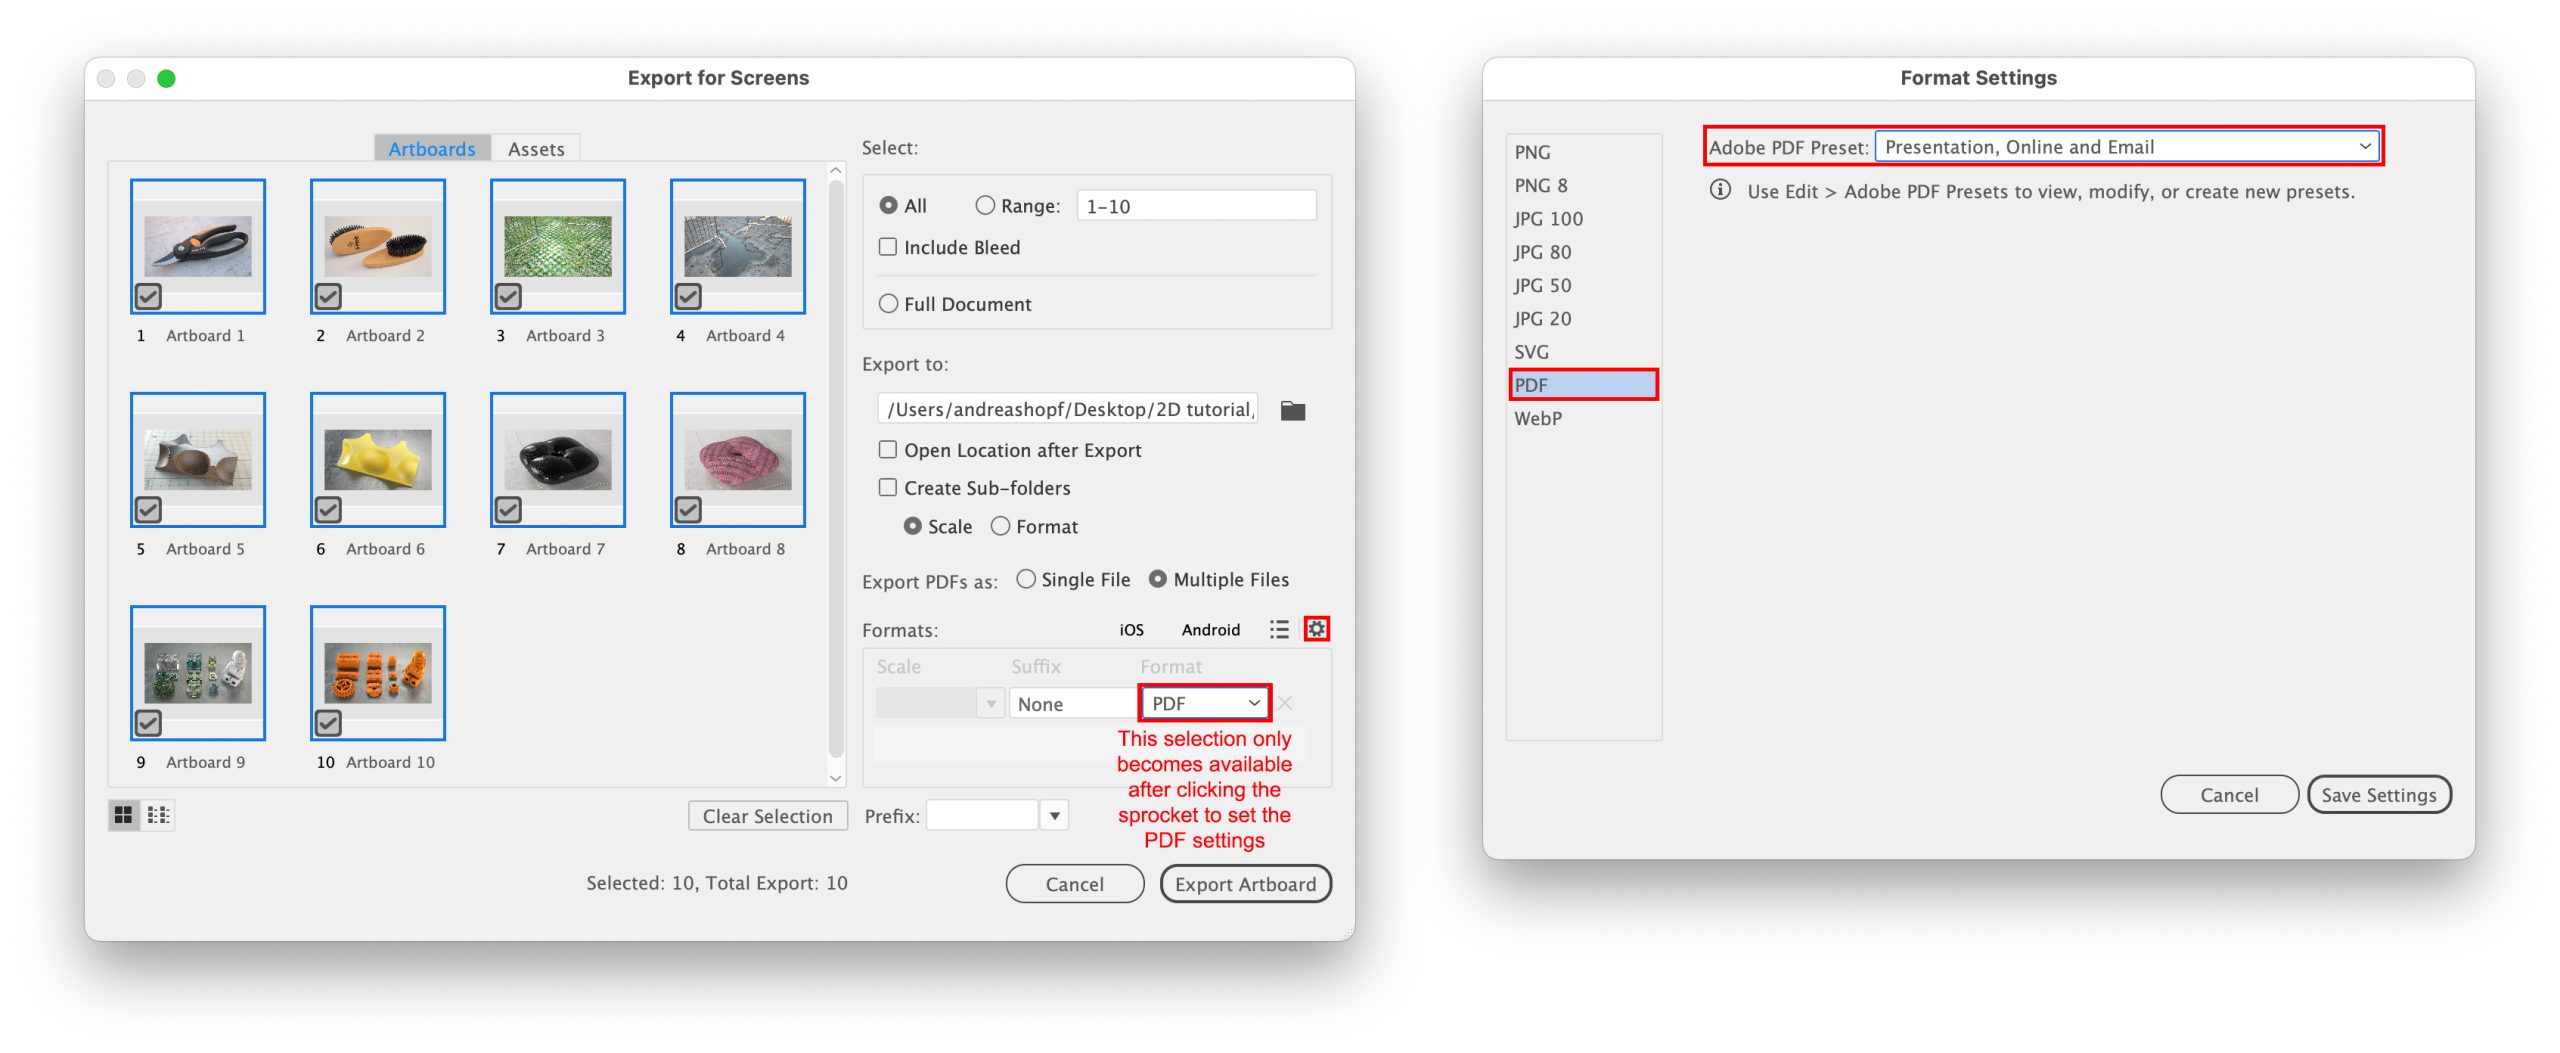
Separate PDF files File > Export > Export for Screens…
- Select All or Range just like above
- Click the sprocket icon
- Select PDF and the Adobe PDF Preset Presentation, Online and Email preset
- Click Save Settings and then select PDF on the previous screen
- Click Export Artboard
Saving InDesign pages as PDF
Single PDF file File > Adobe PDF Presets
- Select the Presentation, Online and Email… preset
- Name your file
- Select All or Range (for example 4-9, or 1-3, 10-16 for discontinuous ranges)
- Click Export
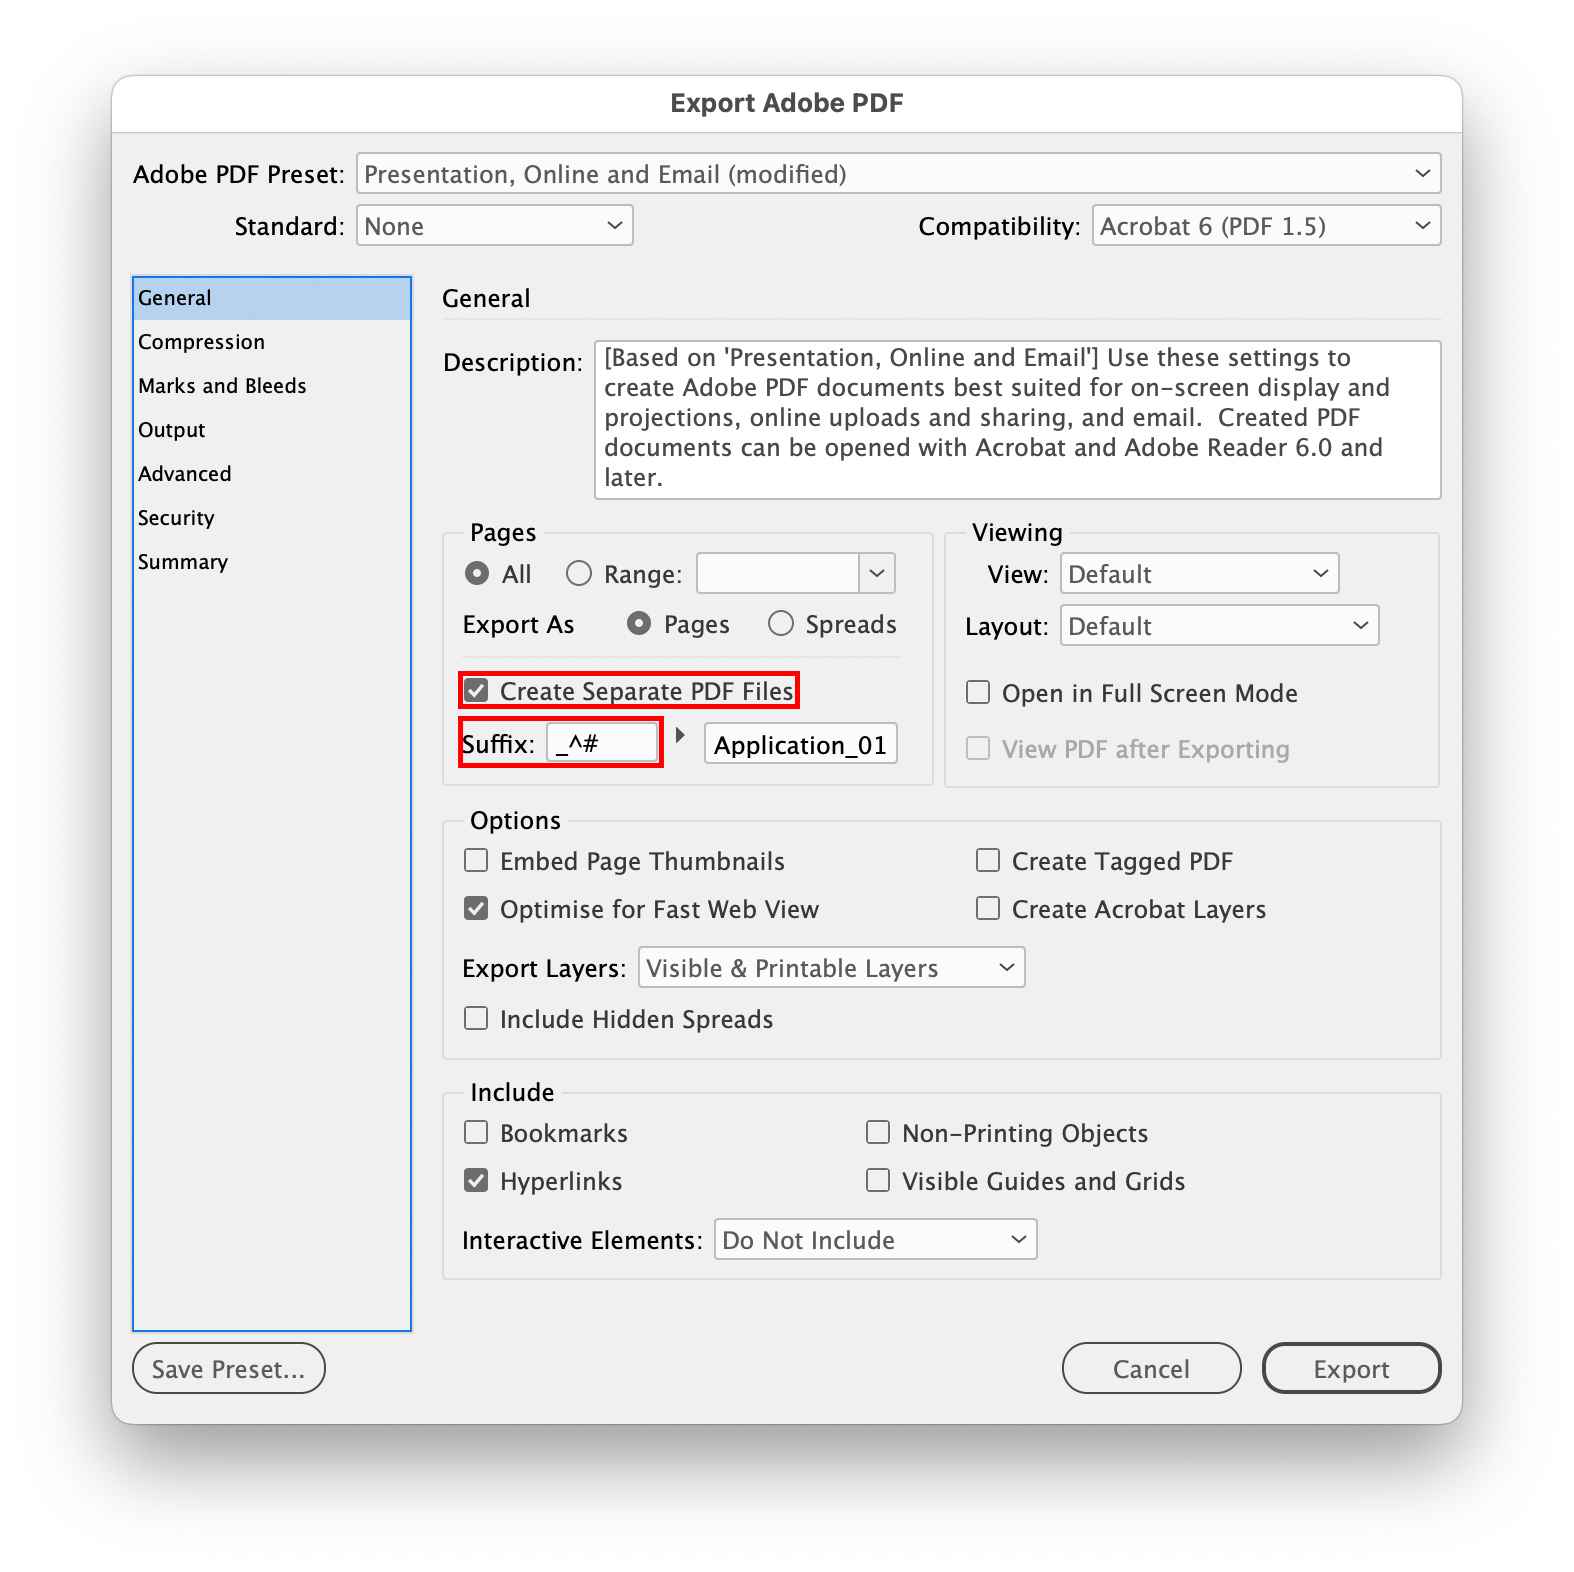
Separate PDF files File > Adobe PDF Presets
- Select the Presentation, Online and Email… preset
- Name your file
- Select Create Separate PDF Files
- Add a suffix (for example _^# will add incremental numbers to the file name)
- Click Export (the PDFs will be put into a new folder)