Maxwell render – Quick tips for beginners
Basic basics to get you started again.
Table of contents
- Setting up a scene (basic drag-n-drop photo studio)
- Rendering a scene (incl. basic Multilight usage and resuming a render)
- Rendering a scene with transparent background (for easy Photoshop compositing)
- Lighting a scene with IBL (easy lighting with HDR images)
- Applying graphics (logos, IMD, decals, user interfaces, displays, etc.)
- Using real scale materials (and the Absolute scale warning)
- Materials (for your own scenes)
- Textures (for your own materials, and as used in our materials and example scene materials)
- HDR images (for your own scenes, and as used in example scenes)
- Scenes (example scenes to experiment with and to learn from)
Red icon = Maxwell Studio app = where you work. Green icon = Maxwell Render app = the renderer that starts when you’re rendering, and where you open .MXI files to use the Multilight and Resume features.
Setting up a scene
- Window > Load Layout load Beginner layout.stlay from the Rendering folder (folder on LTH’s shared drive)
- ATTRIBUTES PANEL > Environment > Type select None
- LIBRARY > Light_Setups > Backdrop+3dif_lights_Up_to_30cm drag to VIEWPORT
- ATTRIBUTES PANEL > Camera > Camera Parameters > Basics > Sensor unlock Resolution, set it to HD format = 1920 x 1080 px and re-lock, then set Pixel Aspect to 1 (when you create a camera manually, by right-clicking in the camera panel, the “0.9 bug” does not appear)
- ATTRIBUTES PANEL > Camera > Camera Parameters > Basics > Optics set Lens to Pin Hole, set Focal Length to 135 mm, and Shutter to 5 (Pin Hole instead of Thin Lens = no DOF = more useful while setting up scene, lighting, materials and textures; don’t forget to reset to Thin Lens before rendering)
- VIEWPORT change from Perspective to Camera
- INTERACTIVE PREVIEW click FIRE in CPU mode (GPU will only work with higher-end NVIDIA GPUs, and some effects cannot be rendered with a GPU)
- Find a free 3D egg OBJ file online or use File > Import… 12174_Egg_v1_l2 from ### materials and texture mapping fundamentals in the Rendering folder
- ATTRIBUTES PANEL > Object select Egg_0
- ATTRIBUTES PANEL > Object Parameters > Transformations > Object > Coordinates set Scale X/Y/Z to 0.001 and Rotation X to -90, and then, very important, click Reset (reason = the output of 3D modeling softwares is often not at the reference scale of a render software, so always check after importing something if the scale is plausible/correct, or needs adjusting)
- VIEWPORT right click Camera > Center Selection (tumble, pan, zoom as you like)
- MATERIAL EDITOR > File > Open MXM… > Rendering > Materials > metal aluminium EN AW-6082 drag onto Egg_0 in the object list panel
- Right click Egg_0, select Clone, and move both eggs next to each other
- RESOURCES BROWSER > materials packs > RAL Plastic select one you like Import > Embed in Scene, and drag onto Clone of Egg_0 in the object list panel
- File > Save As… to save the .MXS scene file as “Tests” (or whatever you like)

Rendering a scene
- If the UI is in default mode, Window > Load Layout load Beginner layout.stlay from the Rendering folder (folder on LTH’s shared drive)
- Open the .MXS file “Tests” (or whatever you want to practice with)
- INTERACTIVE PREVIEW click FIRE
- ATTRIBUTES PANEL > Camera > Camera Parameters > Basics > Optics set Lens to Thin Lens, f-Stop to 16, and Shutter to 0.5
- Focus on the front egg VIEWPORT right click Camera > Auto Focus
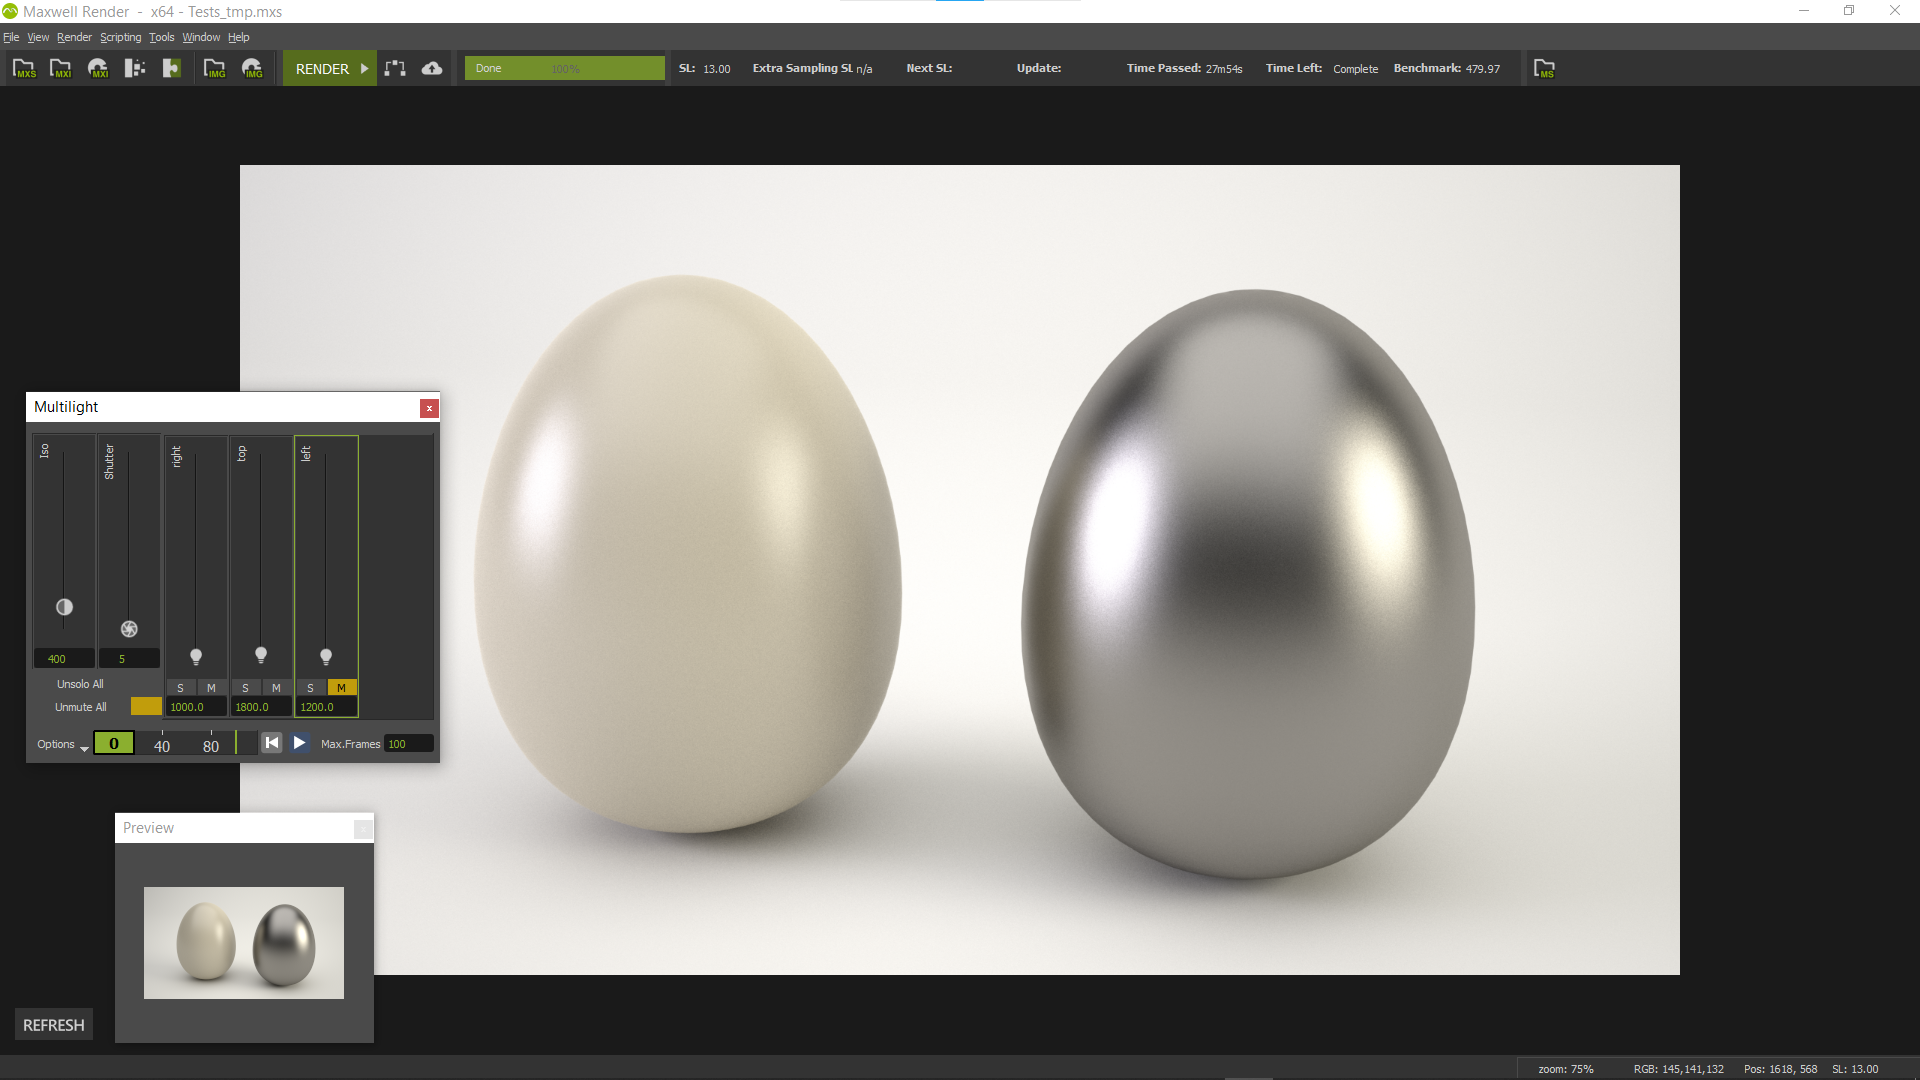
- ATTRIBUTES PANEL > Render Options > Scene > Scene set Time Limit to 20 min, set Sampling Level to 13, set Multilight to Intensity (Multilight is only useful when using emitters, not useful with IBL), and set Priority to Normal
- ATTRIBUTES PANEL > Render Options > Output Files > Output > Image specify a file location and name, MXI use the same location and name, MXS use the same location and name (you need to save the .MXI file to use the Multilight feature, and you need to also save an .MXS file, if you want to resume the render to a higher quality later. Once done, you can delete both files), and set Depth to RGB 16 bpc
- Click RENDER and observe SL, Next SL, Update, etc.
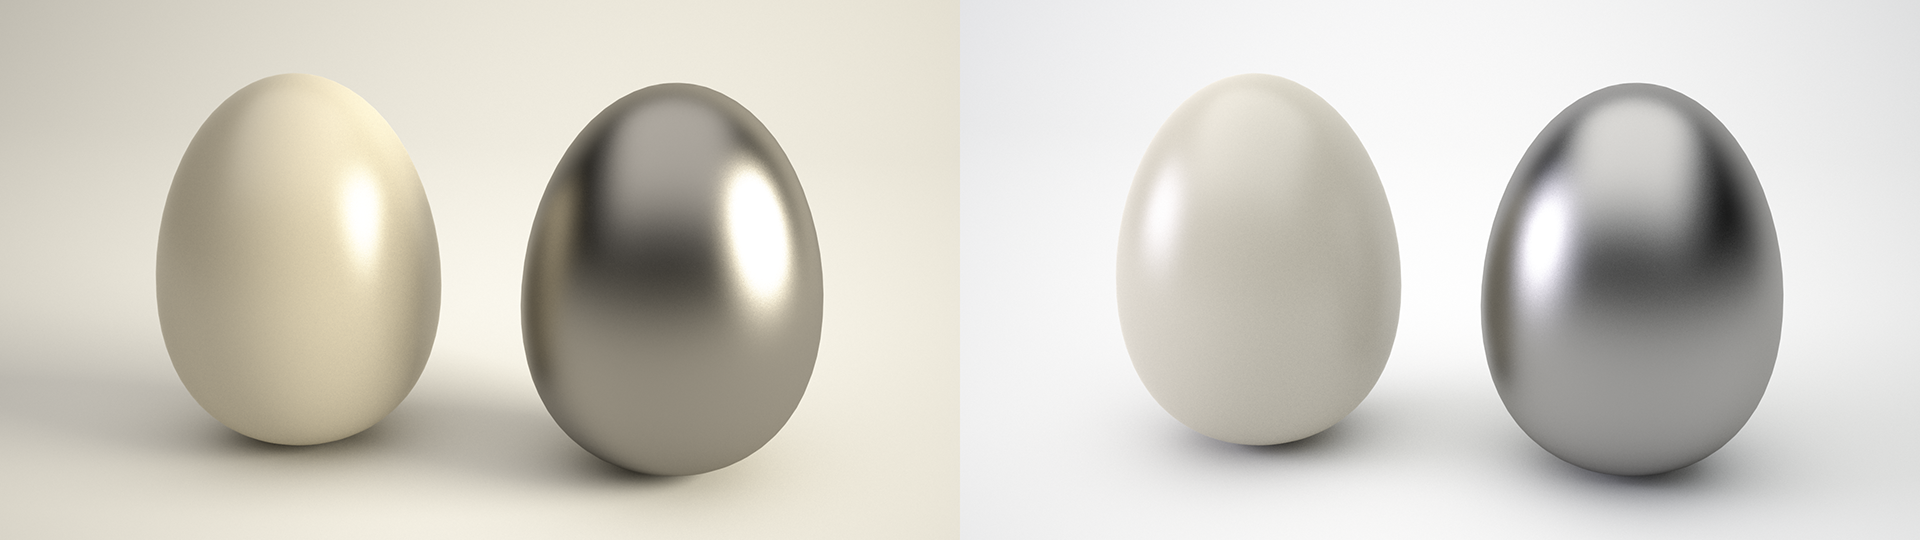
- !-> Change the lighting without re-rendering: Once the rendering is done, open the Window > Camera, Multilight, and Preview panels, and adjust the lighting and brightness as you wish, then click REFRESH (a new rendering will be generated instantly)
- File > Save Image… under Image specify a file name, set Format to 16 bits and click Ok to save the new rendering
- !-> Resume a finished rendering to a higher SL: File > Resume MXI… and open the .MXI file you want to resume, then set the Sampling Level or Time, depending on what you need (usually, you want to achieve a certain SL, so set the time to a “too high” value)
Rendering a scene with transparent background
- If the UI is in default mode, Window > Load Layout load Beginner layout.stlay from the Rendering folder (folder on LTH’s shared drive)
- Open the .MXS file “Tests” (or whatever you want to practice with)
- ATTRIBUTES PANEL > Object select your background, and under Object Parameters > Appearance check Hidden from Camera
- MATERIAL EDITOR check Shadows in the Global Properties of the material assigned to your background
- ATTRIBUTES PANEL > Object select all your objects, but not the background Object Parameters > Appearance check Hidden from Camera in Shadow Channel
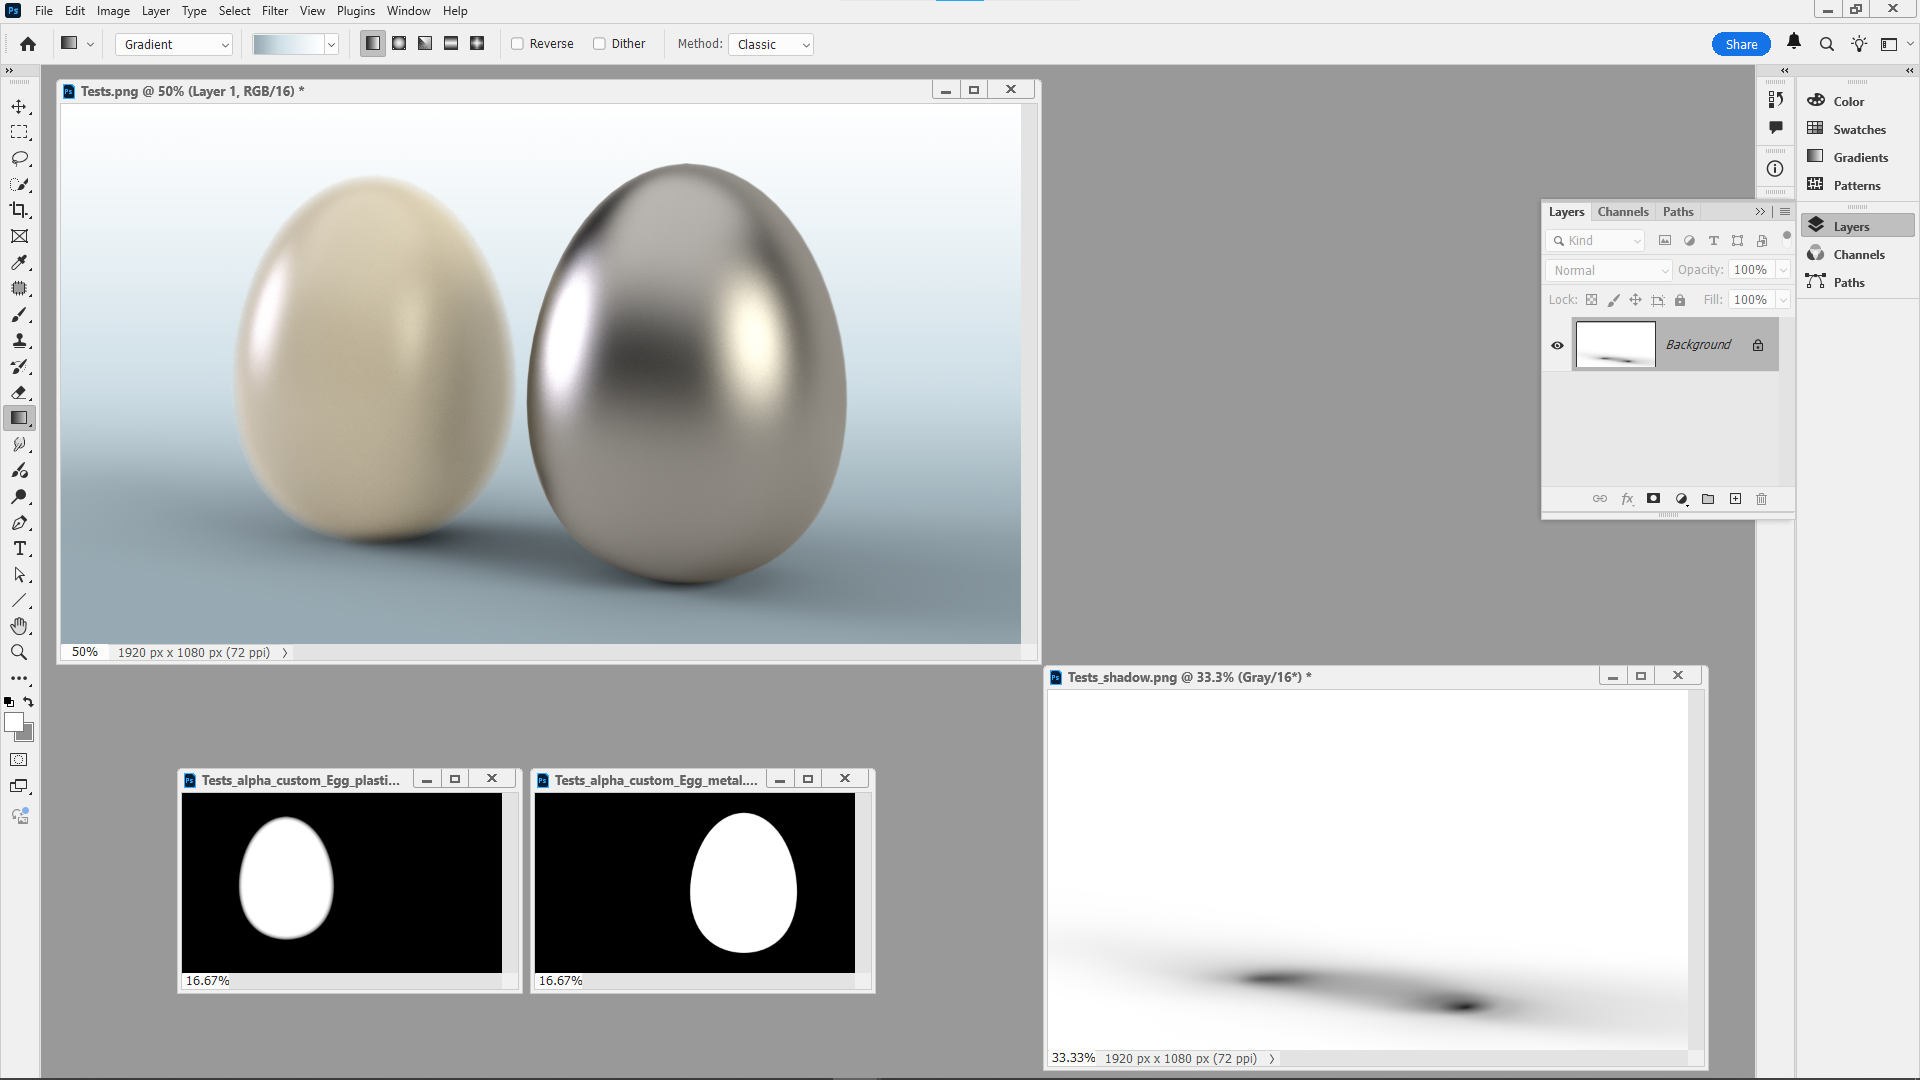
- ATTRIBUTES PANEL > Render Options > Output Files click Advanced and under Channels select Output Mode Embedded, check and set Alpha to PNG 16, check and set Shadow to PNG 16
- Click RENDER and observe SL, Next SL, Update, etc.
- Three buttons on the bottom left allow you to toggle between the rendering of your objects, the alpha channel and shadow image
- Once the rendering is finished, open it and the shadow image in Photoshop, and create a new layer below; fill it with a solid colour, a gradient, or a photo with well matching perspective and lighting (if Multilight was on, you also get a shadow image for each light source)
- Copy and paste the shadow image between the two other layers, and set its layer blending mode to Linear Burn or Multiply to darken whatever you have on the layer below
- Use Image > Adjustments > Levels… to darken the shadows if needed
- To remove the black fringe around your rendered object(s), select Layer > Matting > Remove Black Matte
- !-> You can also render additional alpha channels, based on certain parts or materials, allowing you to make easy CMF adjustments/changes in Photoshop
Lighting a scene with IBL
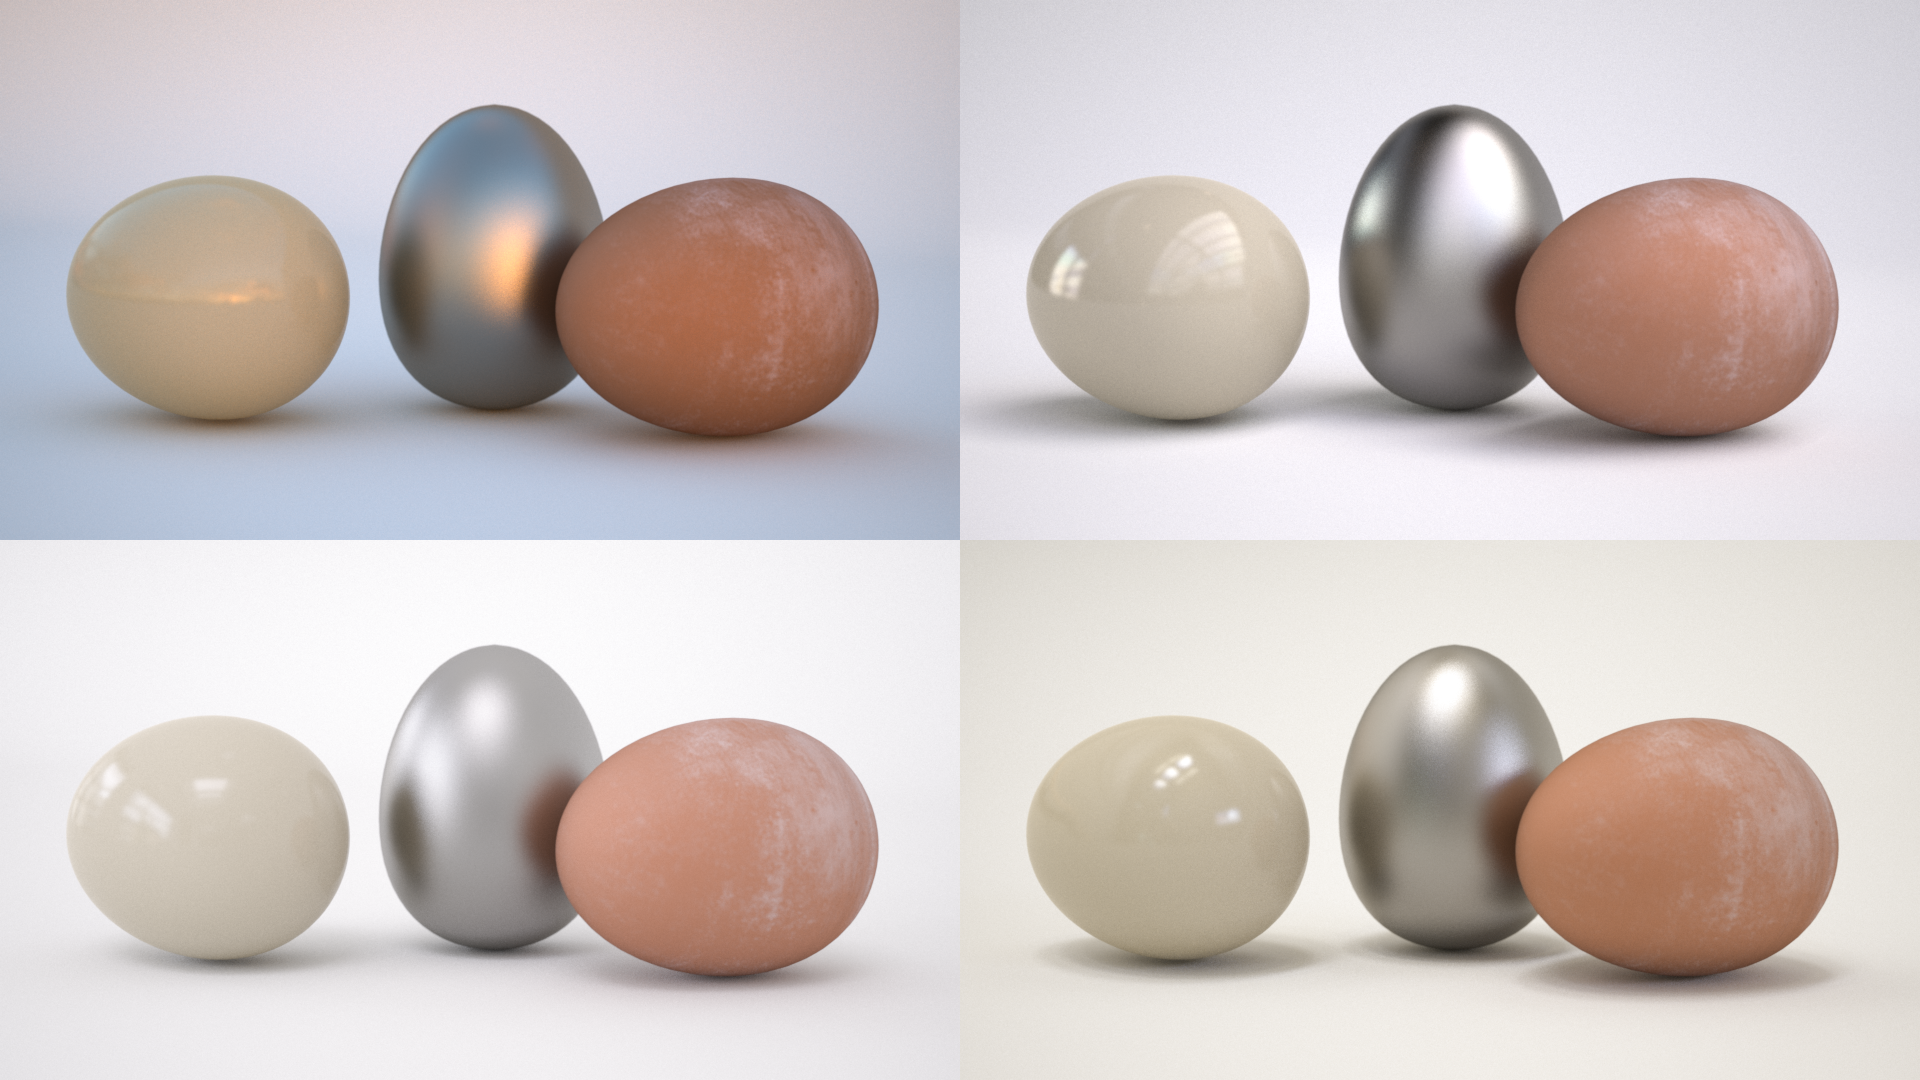
With IBL, image based lighting using HDR images, you don’t have the benefit of using the Multilight feature (as with emitters) but IBL lighting is a straighforward solution for many scenographic photo styling ideas
- If the UI is in default mode, Window > Load Layout load Beginner layout.stlay from the Rendering folder (folder on LTH’s shared drive)
- Open the .MXS file “Tests” (or whatever you want to practice with)
- Set the pivot point of the cloned egg to its centre with ATTRIBUTES PANEL > Transformations > Center and then rotate and move it
- ATTRIBUTES PANEL > Object right click Clone Egg_0 again, so that there’s “more stuff” in the scene; load and assign terracotta aged from the Materials folder to it, and make the plastic material more reflective
- VIEWPORT right click Camera > Auto Focus to focus on the centre of one of the eggs; alternatively, in VIEWPORT > Perspective, you can set the focal point manually by adjusting the camera’s focal plane handle
- Change the camera’s Shutter to 2, because the HDR image will be brighter than the photo studio area light emitters
- Hide the objects soft right, soft left and soft top from the Object list, so their lighting won’t interfere with our IBL lighting
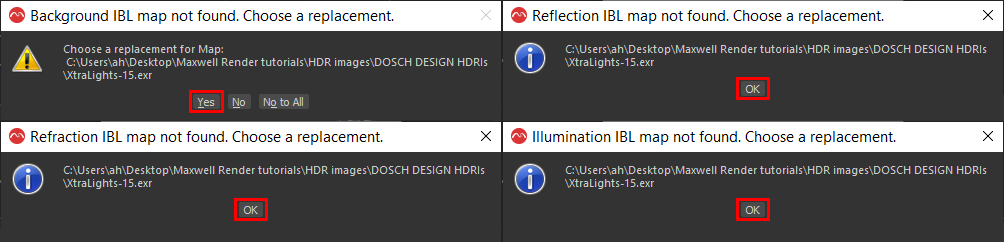
- ATTRIBUTES PANEL > Environment set Type to Image Based and load an HDR image from S:\Courses\design\IDEA90 KID2 IDEN45 MID1 IDEN60 MD4\Rendering\HDR images in Background > Map
- To see where the light and reflections are coming from, set your VIEWPORT to Perspective and enable Display > Sky, then change the Offset(°) angle to rotate the image
- While FIRE is running, try changing the Offset(°) to other angles; try also other HDR images from the HDR images folder to see how the mood of the photo changes; also adjust Shutter and ISO to adjust the brightness if necessary
Applying graphics
Sometimes, you need to apply graphics; they will have a colour, material and finish, and you want to scale and position them accurately on your product(s)
The most important thing is to understand what that means on the material’s side: You are putting a new material (printing ink, sticker paper, metal IMD effect, or thin-film decal) on top of an existing material
This tells you what to do in rendering software: You put a new layer (a material = a BSDF) on top of the existing layer(s). What you do is exactly what would happen in real world production – you put something on top of something
- If the UI is in default mode, Window > Load Layout load Beginner layout.stlay from the Rendering folder (folder on LTH’s shared drive)
- Open the .MXS file “Tests” (or whatever you want to practice with)
- Delete the cloned egg and center the original
- Make sure your camera’s lens is set to Pin Hole while setting things up
- MATERIAL EDITOR > File > Open MXM… > Rendering > Materials > metal aluminium EN AW-6082 silky scratches drag onto Egg_0 in the object list panel
- Click Yes when the Absolute scale warning shows up; then, in the ATTRIBUTES PANEL > Object Parameters > Geometry > UV Sets select Egg_0 projector 0, set Type to Cubic, and click Normalize (see explanation regarding real scale materials in the section below)
- Select the material in the MATERIALS list, click on the Add Layer icon in the material editor, or right click below the existing layers and select Add Layer
- Double click on the new layer and rename it “Logo” (to remember what that layer does)
- INTERACTIVE PREVIEW click FIRE
- Click on the new layer’s Opacity/Mask texture slot, and in the Texture Picker load the file graphic o from the ### materials and texture mapping fundamentals folder in the Rendering folder (white = transparent = layer is visible, black = opaque = layer is invisible, similar to a Photoshop layer mask)
- While in the Texture Picker, set Channel to 1 and Method to No Tiling (no repeat)
- Why two channels? The material already uses a Global Bump bump texture map that is in the material’s default texture Channel 0, which corresponds to the Egg_0 object’s default UV set projector projector 0. This is why the graphic o texture map – that you want to apply independently of other texture maps at a certain size in a particular position – needs another texture channel, and why the object needs another UV set projector
- Therefore, in the ATTRIBUTES PANEL > Object Parameters > Geometry > UV Sets click on New to create another UV set projector for Egg_0 and rename it “Logo” (to remember what that projector is for)
- Set the UV set projector Type to Planar and its Channel to 1, then click Adjust, which puts it to the centre of the object at the default size of 1 x 1 m. In Scale X/Y, type in the texture’s real-world dimensions – here 0.04 x 0.02 m
- Select the UV set projector and activate the UV mode in the icon menu bar, and set the VIEWPORT to Textured decal mode to see and work with the UV set projector
- To visually position the projector and its texture, click on the little checker icon at the top left of the material’s preview, and select the texture you’d like to see – here graphic o
- Move and rotate the UV set projector so that the product graphic appears on your object where you want it to be; then try changing the BSDF Reflectance 0 colour and Roughness in the material’s “Logo” layer to see what happens
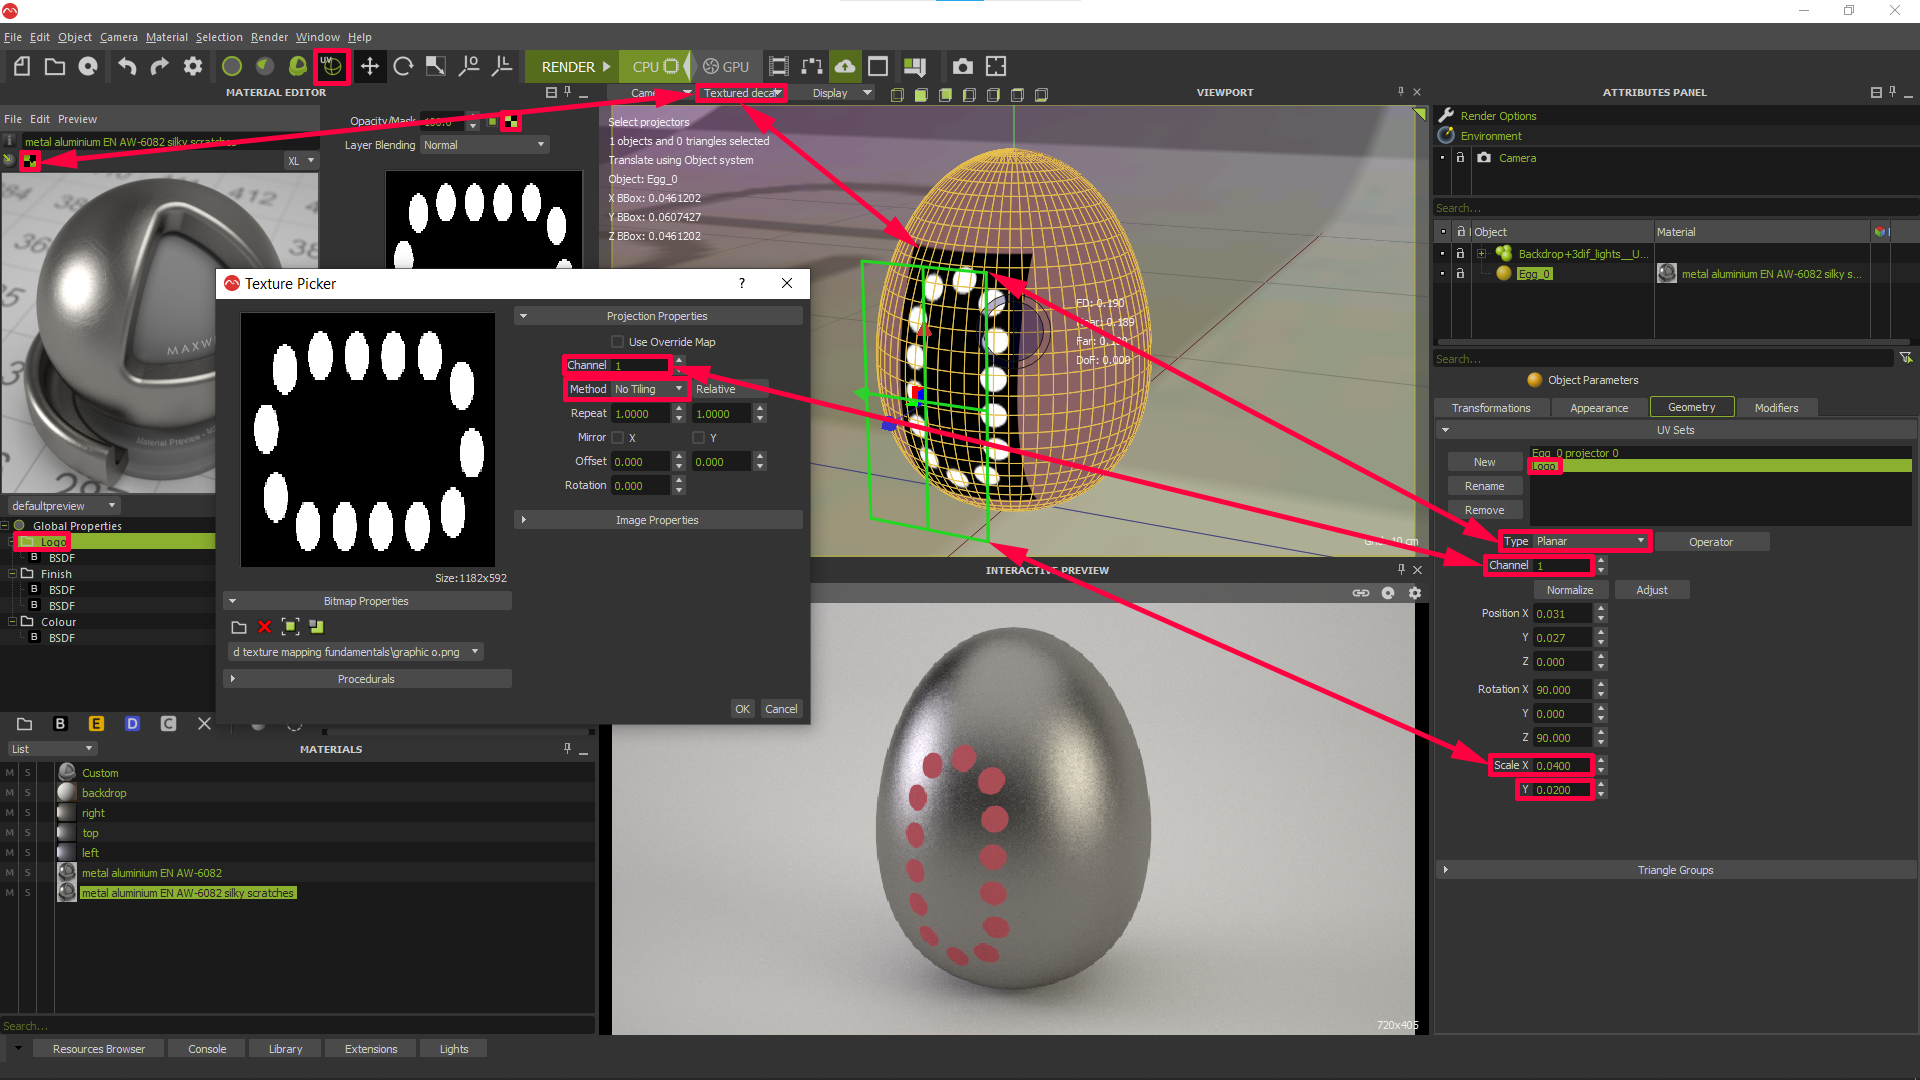
- !-> Often, product graphics are multicoloured. So, instead of changing the Reflectance 0 colour by its colour chip, you can also texture map it. Click on the Reflectance 0 texture slot, and in the Texture Picker, load graphic d from ### materials and texture mapping fundamentals in the Rendering folder and set its Channel to 1 so that it is also applied to the object with the “Logo” UV set projector
- Material texture Channel 0 = real scale microscratches bump texture map / Object projector Channel 0 = cubic, normalized
- Material texture Channel 1 = opacity and diffuse texture maps / Object projector Channel 1 = planar, scaled by user
- Texture mapping the visibility of a layer is also how you can render hole, slot or grille patterns, wire or textile meshes, etc., without having to laboriously 3D model them
Using real scale materials
When you create a new material, and in materials where the texture’s size shall be controlled by the size of an object‘s projector, the texture application Method is set to Relative by default
However, for large textures like on walls, wooden and stone floors, kitchen tops and fronts, tables, etc., or for microtextures like plastic and metal reliefs, subtle scratches, dust, etc., it is much easier to use “real scale materials”, meaning that the texture application Method in the Texture Picker is set to Meters, because you can drag and drop these materials on any object, and the texture’s size will always be the same – independent of the object’s size
- If the UI is in default mode, Window > Load Layout load Beginner layout.stlay from the Rendering folder (folder on LTH’s shared drive)
- Open the .MXS file “Tests” (or whatever you want to practice with)
- MATERIAL EDITOR > File > Open MXM… > Materials > plastic ABS shiny scratches dust LEGO 106 Bright Orange and drag it onto Egg_0 in the object list panel
- Click Yes when the Absolute scale warning shows up
- What does it mean? It alerts you to the fact that you are assigning a real scale material to an object, a material where one or more of its textures have heir application Method set to Meters, and that means that you need to change the object’s UV set projector to a specific setting
- In the ATTRIBUTES PANEL > Object Parameters > Geometry > UV Sets select Egg_0 projector 0, set Type to Cubic and click Normalize
- Activate the UV Mode in the icon menu bar, and set the VIEWPORT to Textured decal mode, if you want to see Egg_0‘s projector Egg_0 projector 0 – it’s a green 1 x 1 x 1 meter cubic projector icon (a real scale texture projector)
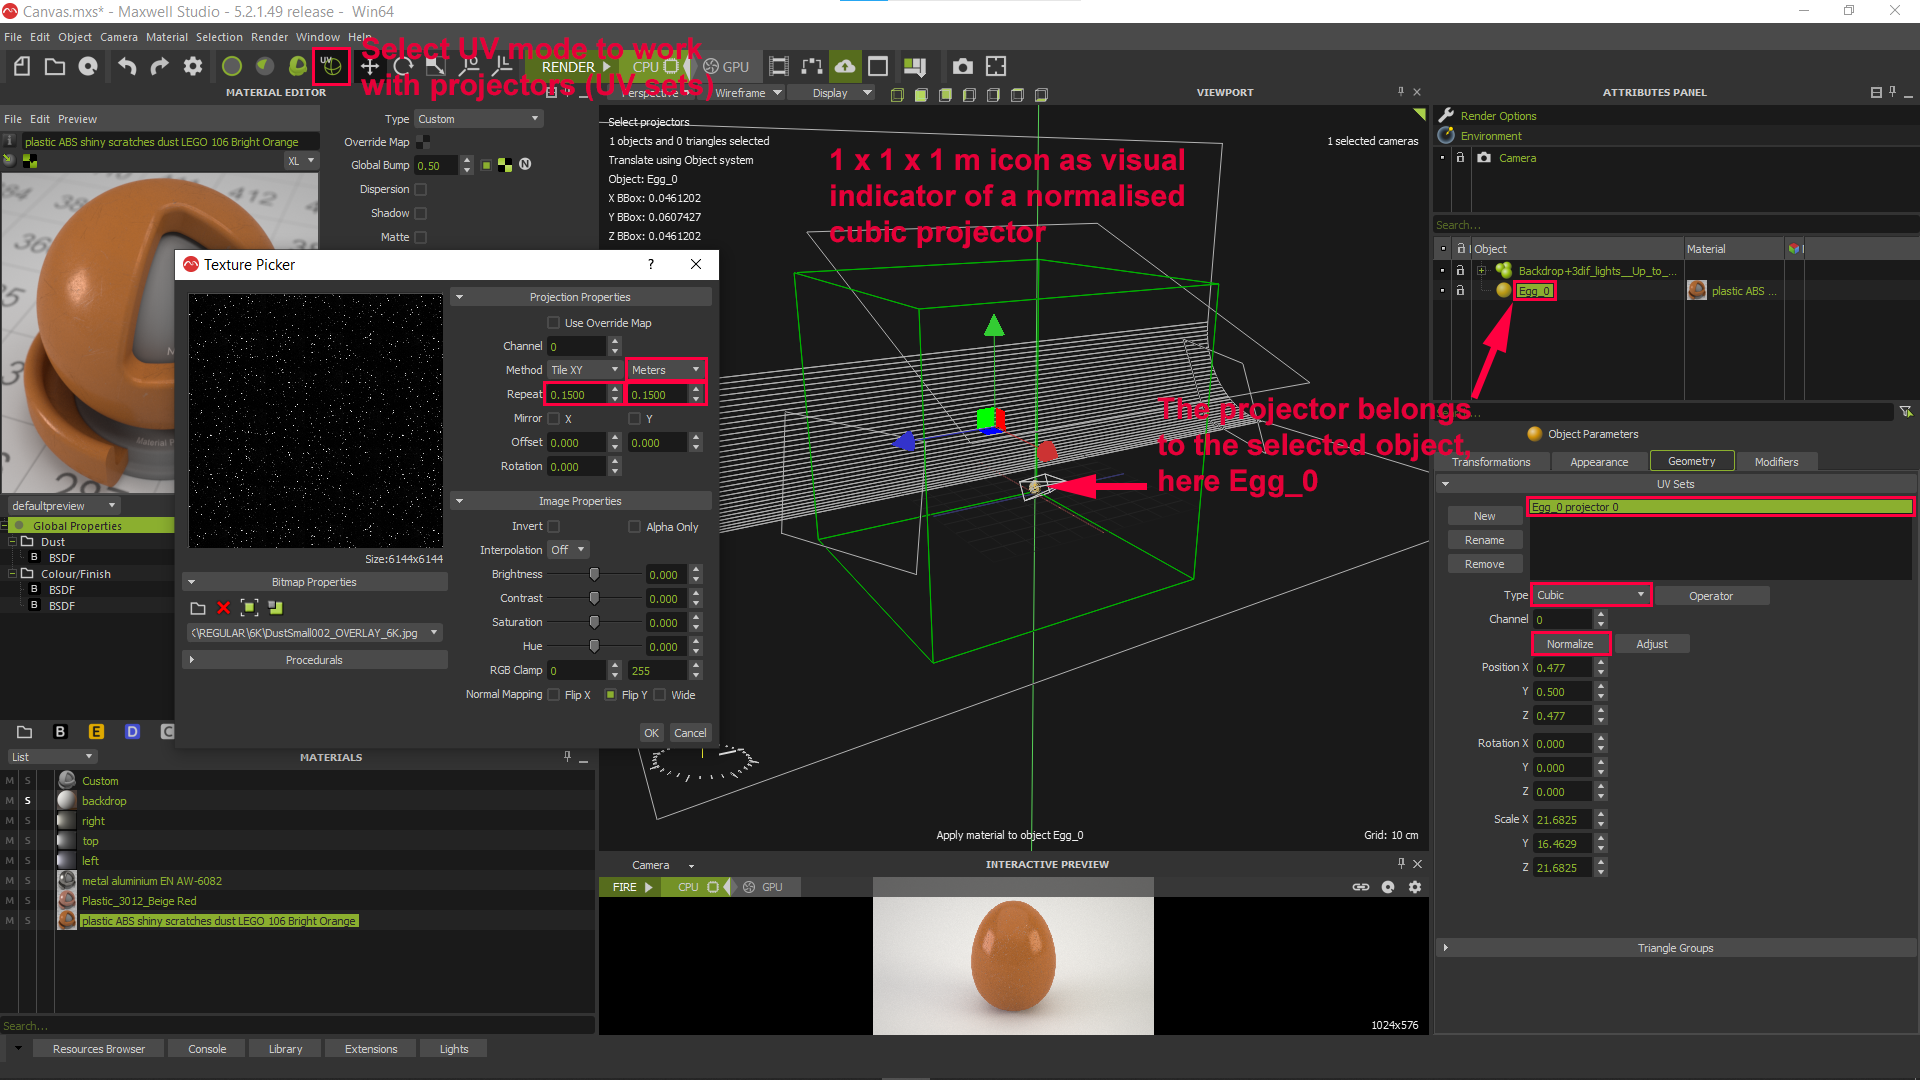
- Then, please open all textures in the material’s two Colour/Finish layer’s BSDF Bump texture slots, the Dust layer’s Opacity/Mask texture slot, and Global Bump texture slot. You will see that in this material, all textures have their Method set to Meters and their Repeat values are set to their real world dimension (in metres)
- This is why, when you are assigning a real scale material to an object, you will receive the Absolute scale warning message – to simply alert you that when using a real scale material, you must change the object’s projector to Cubic and then click Normalize (otherwise, the textures have the wrong size and won’t look realistic)
Materials
You’ll find ready to use materials, denoted with file prefix .MXM, at /shared/Courses/design/IDEA90 KID2 IDEN45 MID1 IDEN60 MD4 in the /Rendering/Materials folder. Please click How to connect from… for how to access LTH’s shared drive (for macOS and Windows). Make yourself a shortcut to that folder; it saves you from “clicking through” all the time.
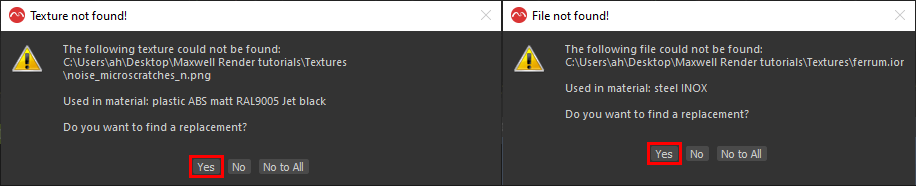
Please note that when you’re copying/opening a material from LTH’s shared drive that the file paths of linked textures/files will not relate to your home directory or your laptop’s folder structure. Please don’t dismiss messages like the below – always click yes to re-link!
You’ll find more ready to use materials under materials packs in the RESOURCES BROWSER tab at the bottom left of your screen.
Best practice to use materials in your home directory or on your own laptop:
- Open Maxwell Studio (red app icon)
- MATERIAL EDITOR > File > Open MXM… S:\Courses\design\IDEA90 KID2 IDEN45 MID1 IDEN60 MD4\Rendering\Materials and select one or more materials
- In the Open MXM window click Embed in Scene (now the material is part of your scene file)
- In all (something) not found! windows click Yes to re-link the missing files from the S:\Courses\design\IDEA90 KID2 IDEN45 MID1 IDEN60 MD4\Rendering\Textures folder – do this for all files you’re asked for, don’t skip a single one! Other files of the same type will be re-linked automatically
- MATERIAL EDITOR > File > Pack and Go MXM on your desktop, in your home directory, or elsewhere, create a “Maxwell materials“ folder and select it
- The .MXM is now saved to that folder, and all the texture files it uses are in a sub-folder named “textures” inside the Maxwell materials folder
- Repeat for every material that you want to “liberate” from LTH’s shared drive. When you open and use materials “liberated” this way, they “know” where their linked texture files are
Textures
You’ll find the textures, denoted with file suffix .png, .jpg or .ior, which are used in materials (.MXM) and scene (.MXS) files at /shared/Courses/design/IDEA90 KID2 IDEN45 MID1 IDEN60 MD4 in the /Rendering/Textures folder, or in the example projects’ folders. Please click How to connect from… for how to LTH’s shared drive (for macOS and Windows). Make yourself a shortcut to that folder; it saves you from “clicking through” all the time.
You’ll find a very large selection of professional high-resolution textures under /shared/Support/Design textures. Make yourself a desktop shortcut to that folder; it saves you from “clicking through” all the time. Before spending a lot of time downloading and opening these textures to see if they really are what you want, it is much faster to first check them out online with the TEXTURE BROWSER at https://www.arroway-textures.ch/textures/ where you also find information about the dimensions a texture represents in the real world, etc.
HDR images
You’ll find various useful HDR images, denoted with file suffix .exr or .hdr, which are used for IBL in scene (.MXS) files at /shared/Courses/design/IDEA90 KID2 IDEN45 MID1 IDEN60 MD4 in the /Rendering/HDR images folder. You’ll find more HDR images at /shared/Courses/arkitektur/Dosch Design HDR IMAGES. Please click How to connect from… for how to LTH’s shared drive (for macOS and Windows). Make yourself a shortcut to these folders; it saves you from “clicking through” all the time.
You’ll find a large selection of professional high resolution HDR photo studio light images at /shared/Courses/design/IDEA90 KID2 IDEN45 MID1 IDEN60 MD4 in the /Rendering/HDR images/Photo studio lights – HDRI Volume 3 folder. Before spending a lot of time downloading and opening the files to see if they really are what you want, it is much faster to first check them out online https://alsens.net/photo-sstudio-lights-hdrs-pack-30 where you also find information about the dimensions each HDR photo studio light image represents in the real world, etc.
Scenes
You’ll find various example scenes, denoted with file suffix .MXS, related to the tutorial videos and other interesting topics at /shared/Courses/design/IDEA90 KID2 IDEN45 MID1 IDEN60 MD4 in the /Rendering folder in subfolders denoted with folder prefix #. Please click How to connect from… for how to LTH’s shared drive (for macOS and Windows). Make yourself a shortcut to these folders; it saves you from “clicking through” all the time.
Please note that when you’re copying/opening a scene from LTH’s shared drive that the file paths of linked textures/files will not relate to your home directory or your laptop’s folder structure. Please don’t dismiss messages like the below – always click yes to re-link!

Best practice to use scenes in your home directory or on your own laptop:
- Open Maxwell Studio (red app icon)
- File > Open S:\Courses\design\IDEA90 KID2 IDEN45 MID1 IDEN60 MD4\Rendering\# (# = scene folders related to the tutorial videos and other interesting topics)
- In all (something) not found! windows click Yes to re-link the missing files from the S:\Courses\design\IDEA90 KID2 IDEN45 MID1 IDEN60 MD4\Rendering\HDR images or Textures or # folder – do this for all files you’re asked for, don’t skip a single one! Other files of the same type will be re-linked automatically
- File > Pack and Go… on your desktop, in your home directory, or elsewhere, create a “Maxwell projects“ folder and select it
- The .MXS scene file with all materials and texture files used is now saved to that folder
- Repeat for every scene that you want to “liberate” from LTH’s shared drive. When you open and use scenes “liberated” this way, they “know” where their linked texture files are